This is a continuation of the previous post where I went over how to print, wire, solder, and assemble the robot. With this post, I will be discussing the software design of the robot, as well as the considerations that I took in designing it. I’m assuming that you have some working knowledge of JavaScript and MongoDB. I realize that the Angular.js code that is written here may not be the most efficient, since the whole point of me building the robot was to learn Angular (and also make some thing awesome). Therefore, if you spot any changes that need to be made to the code to increase efficiency or whatnot, please let me know in the comments or send a pull request to the Bar Mixvah GitHub. Here’s a video of the robot in case you missed the previous post:
Navigation:
- Part 1: Hardware and Electrical Design
- Part 2: Software Design (you are here)
- Part 3: Operation, Caveats, and Further Modifications
Why the MEAN Stack
So, before I proceed, a few people have asked why we need so much technology to do something so simple as mixing drinks. What is the MEAN stack? It consists of MongoDB, Express.js, Angular.js, and Node.js. Everything works beautifully together because it’s all JavaScript (and MongoDB, which uses BSON, similar to JavaScript’s JSON). Why do we need the MEAN stack? Well, we don’t need it. But it makes things easier, so that’s why I’m using it.
- MongoDB is used to store all of the drink and pump information
- Express.js is the web server so that your WiFi connected devices can access the interface
- Angular.js is used on the front end to filter drinks based on what ingredients have been selected
- Node.js is used on the backend to communicate with the Arduino
Preparing Your Arduino
The Arduino Nano talks to the Johnny-Five node.js package via the Standard Firmata protocol. You will need to flash Standard Firmata onto your Arduino:
- Download the Arduino software
- Plug in the Arduino to your USB port on your computer
- Open the Arduino software
- Go to File > Examples > Firmata > StandardFirmata
- Click the Upload button in the top-left

Starting the App
Bar Mixvah requires node.js, MongoDB, and git. Follow the respective links to download and install them if you haven’t already. The commands here are run in the Mac OS or Linux shell; I don’t have much experience with the Windows command line, but I believe most of the stuff is the same (except you should remove sudo if you see it, and run your command prompt as an administrator). To start off, clone the Bar Mixvah GitHub repository onto your local hard drive:
git clone https://github.com/ytham/barmixvah.git
cd into the directory and install all node.js packages:
cd barmixvah
npm install
This will install all of the packages required for the node.js app to run. Before you can run it, you must start mongodb:
sudo mongod
In a new terminal window, cd to the barmixvah directory again. Plug in the Arduino to your computer via USB. You can now start the robot app:
node app.js
Congrats! It should now be up and running. You can now point your web browser to http://localhost:3000 to check it out. The rest of this post will go towards explaining the code for the robot. If you haven’t yet set up the Arduino, you can read the next section to set up the UI without having it connected to an Arduino for testing purposes.
Debugging the App Without the Arduino
The app can be started without an Arduino by commenting out the following section:
> public/javascripts/robot/backend.js
var board, pump0, pump1, pump2, pump3, pump4;
/*
var five = require('johnny-five');

board = new five.Board();
board.on('ready', function () {
 // Counting down pins because that's the orientation
 // that my Arduino happens to be in
 pump0 = new five.Led(7);
 pump1 = new five.Led(6);
 pump2 = new five.Led(5);
 pump3 = new five.Led(4);
 pump4 = new five.Led(3);

 board.repl.inject({
  p0: pump0,
  p1: pump1,
  p2: pump2,
  p3: pump3,
  p4: pump4
 });

 console.log("\033[31m[MSG] Bar Mixvah Ready\033[91m");
});
*/
This will prevent Johnny-Five from initializing the Arduino. This is useful for testing UI or backend code on the go if you’re not tethered to an Arduino.
General Flow
Here’s a pretty simplified design that gives you a general picture of how the code works with the physical elements:
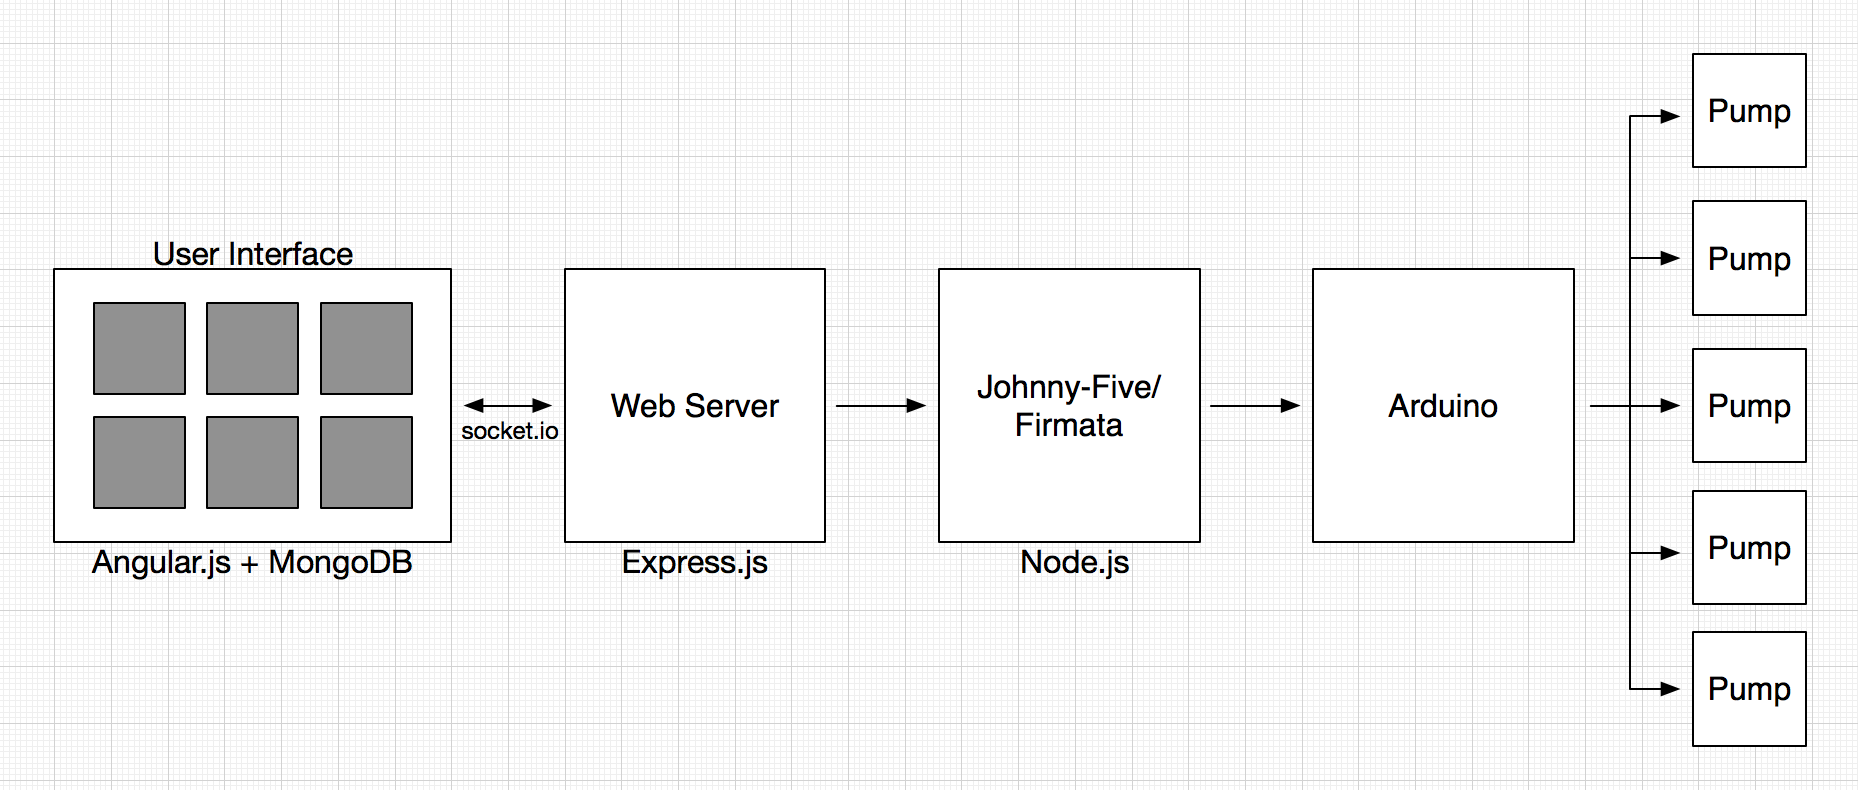
When a user interacts with the UI, Angular.js (or some custom JavaScript/jQuery) will change what is displayed on the screen. If the user decides to make a drink with the Make button, the selected drink JS object and drink size are passed to the backend via socket.io. From there, the app passes the data to the Johnny-Five package and communicates when to start/stop the array of pumps.
Drink and Pump Schemas
The drink schema that will be saved into MongoDB (via the Mongoose node.js package) is specified below:
> models/Drink.js
exports.DrinkSchema = new Mongoose.Schema({
 name: { type: String, required: true },
 image: { type: String, required: false },
 ingredients: [{
  name: String,
  amount: Number
 }]
});
The drink objects have a name, image, and an array of ingredient objects that contain the their name and relative amount. Ingredient amounts are relative and unitless because then the user can specify the drink size and get the actual amount of each ingredient to pump based on the specified drink size.
Here is the pump schema:
> models/Pump.js
exports.PumpSchema = new Mongoose.Schema({
 label: { type: String, unique: true, sparse: true, required: true },
 ingredients: [{
  label: String,
  ingredient: String
 }]
});
We have one pump object that contains an array of pumps that have a label (such as “pump0”, “pump1”, etc…) and an ingredient associated with that pump. In this case, we use the label because order is important and we want to ensure that the pumps are in the correct order regardless of how they are modified. When any pump is updated via the UI, the entire pump object that contains all of the (up to five) pumps is updated in MongoDB. This keeps things consistent and ensures that pumps are updated correctly.
> routes/index.js
exports.updatePump = function (Pump) {
 return function (req, res) {
  Pump.findOneAndUpdate({ _id: req.body._id },
   {
    ingredients: req.body.ingredients
   },
  function (err, pump) {
   if (pump == null) {
    Pump.create(req.body);
    pump = req.body;
   }
   res.send(pump);
  });
 }
}
Choosing Pumps
The pump system is set up so that as soon as the any of the pump ingredients are changed, the entire pumps object (containing all of the individual pump ingredients) is changed. The ng-click directive in this case calls two functions. One function saves the pumps object by overriding the previous pumps object, the other figures out the number of duplicate ingredients and writes the number of duplicates that are checked at other times (such as when the Make button is pressed). The reason why we don’t just check pumps for duplicates immediately is if, say you are a user and you want to move “Orange Juice” from pump0 to pump2. You might change pump2 to “Orange Juice” first, but if that throws an error since “Orange Juice” is also currently on pump0, that is not a very good user experience.
> views/index.jade
div.pumpContainer(ng-repeat="pump in pumps.ingredients")
 select.mixers(ng-change="savePumpValue($index); writeNumDuplicates()", ng-model="pump.ingredient", ng-options="i for i in ingredientsList")
The savePumpValue function sends a post request with the $scope.pumps object. The pumps object is data bound to the view via Angular, so the changes in the dropdown are automatically modified on the front end, but we just need to save it into the database so that when the user refreshes the page, they get the same pumps instead of having to start over.
> public/javascripts/controller/DrinkController.js
$scope.savePumpValue = function (pumpNumber) {
 $http.post('/updatepump.json', $scope.pumps).success(function (data) {
  if (data) {
   console.log(data);
  }
 });
};
From here, the web server receives the HTTP POST request via the updatepump.json endpoint.
> app.js
var routes = require('./routes/index');
...
app.post('/updatepump.json', routes.updatePump(Pump));
And then the updatePump function is run, creating a pump if there is none, and updating the current pumps object if it already exists.
> routes/index.js
exports.updatePump = function (Pump) {
 return function (req, res) {
  Pump.findOneAndUpdate({ _id: req.body._id },
  {
   ingredients: req.body.ingredients
  },
  function (err, pump) {
   if (pump == null) {
    Pump.create(req.body);
    pump = req.body;
   }
  res.send(pump);
  });
 }
}
Pump Operation
The pumps are switched on/off by the 5V from the Arduino pins going to the each of the TIP120 transistors, which in turn switch the 12V for the individual pumps. Since the Johnny-Five package contains a simple interface for LEDs, I decided to use its switch on/off properties for switching the pumps because it’s just a simple digitalWrite(HIGH/LOW). Here’s the code for it:
> public/javascripts/robot/backend.js
 pump0 = new five.Led(7);
 pump1 = new five.Led(6);
 pump2 = new five.Led(5);
 pump3 = new five.Led(4);
 pump4 = new five.Led(3);
The pumpMilliseconds function is used to run a single pump for a number of milliseconds. The usePump function (not shown here) determines which pump to use based on the pump input string.
> public/javascripts/robot/backend.js
function pumpMilliseconds(pump, ms) {
 exports.startPump(pump);
  setTimeout(function () {
 exports.stopPump(pump);
 }, ms);
}

exports.startPump = function (pump) {
 console.log("\033[32m[PUMP] Starting " + pump + "\033[91m");
 var p = exports.usePump(pump);
 p.on();
}

exports.stopPump = function (pump) {
 console.log("\033[32m[PUMP] Stopping " + pump + "\033[91m");
 var p = exports.usePump(pump);
 p.off();
}
Making a Drink
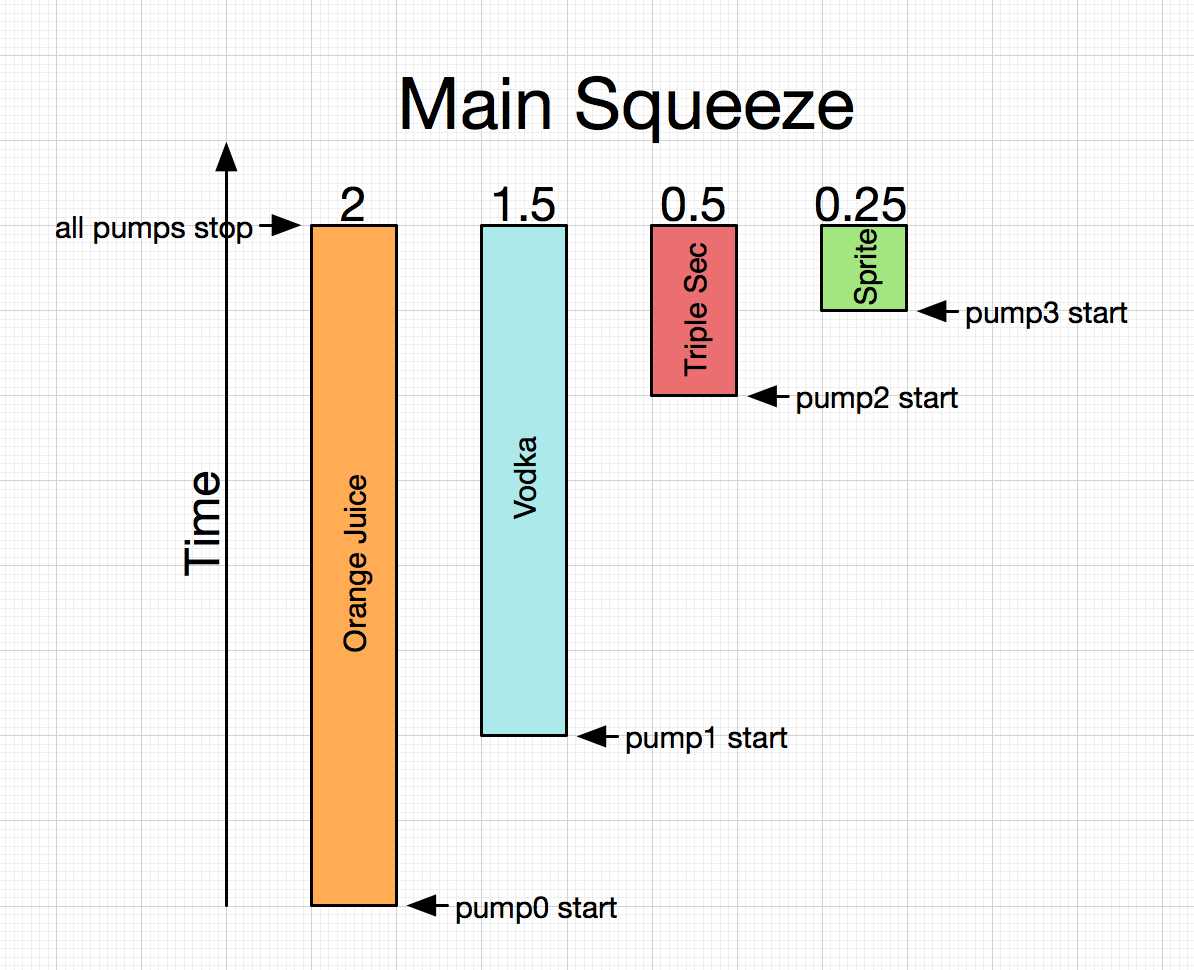
The simplicity of the UI hides much of the complexity behind the actual making of a drink. We want to make a drink that is top-biased in terms of ingredients. That is, all of the ingredients with smaller amounts should be on top so that gravity will cause them to mix into the drink. This adds a little bit of complexity in that we need to also pass a delay amount for each pump, but it is worth it for a drink that is mixed better! Here’s a diagram of how the pump timings will work out:
When the user picks a drink and size, the data is stored as a local variable in the Angular $scope.
views/index.jade
div.drinkContainer(ng-repeat="drink in drinks | orderBy: 'name' | filter: containsIngredients", ng-click="selectDrink(drink)")
public/javascripts/controllers/DrinkController.js
$scope.selectDrink = function (drink) {
 $scope.selectedDrink = drink;

 if ($scope.lastSelected) {
 $scope.lastSelected.selectedDrink = '';
 }

 this.selectedDrink = 'selectedDrink';
 $scope.lastSelected = this;
};
The Angular ng-click directive in the jade template file specifies the function to be run in the Angular $scope when the div is clicked. In this case, when the div is clicked, the $scope.selectedDrink variable gets set to the current drink object. When the Make button is pressed, code on frontend.js does two things: 1) it does some visual trickery to turn the Make button into a progress bar, and 2) it does the calculations required to determine how long each of the pumps should fire for based on the ingredients in the drink and the size of the drink selected. So, here’s the code for what happens when we tap the Make button:
> public/javascripts/robot/frontend.js
$('#make').on('click touch', function () {
 if ($('#make').hasClass('noselection') === true) {
  alert('Please select a drink first.');
 return;
 }

 if ($('#make').hasClass('disabled') === true) {
  return;
 }
First, we double check to make sure that a drink has been selected first. We can’t make anything if there is no selected drink. Additionally, if the robot is already making a drink, the Make button will be disabled and should not make a drink until it is done with the drink it is already making. Next, in the following code, you’ll see how we do the visual progress bar for the Make button. We add the ‘disabled’ class to prevent additional drinks from being made until the current one is done, show the hidden #makeProgress div, and then animate it via its margin-left style. At the end of the animation, the anonymous callback function hides the makeProgress bar and removes the ‘disabled’ class. The whole thing is wrapped around a 200ms delay in order for us to get the $scope.pumpTime, which is calculated in the makeDrink function that is explained further down in this section. After this, we call the makeDrink function with the drink’s ingredients, the pumps, and the selected drink size ($scope.drinkTime).
> public/javascripts/robot/frontend.js (continuing $('#make').on...)
 console.log('Making Drink');
 $('#make').addClass('disabled');
 $('#makeProgress').show();
 setTimeout(function () {
  console.log("Time to Dispense Drink: " + $scope.pumpTime + "ms");
  $('#makeProgress').animate({
   'margin-left': String($(window).width()) + 'px'
  }, parseInt($scope.pumpTime), 'linear', function () {
   $('#make').removeClass('disabled');
   $('#makeProgress').hide();
   $('#makeProgress').css('margin-left', '-10px');
  });
 }, 200);

 // Start dispensing drink
 makeDrink($scope.selectedDrink.ingredients, $scope.pumps, parseInt($scope.drinkTime));
 });
The code below goes through getting the total amount of all of the ingredients, finding the ingredient with the largest amount, and also appending pump labels to the ingredients as a string so that we will be able to determine which pump to use after this data is sent to the backend.
> public/javascripts/robot/frontend.js
function makeDrink(ingredients, pumps, drinkSize) {
 // Check that there are no duplicate pumps ingredients
 if ($scope.pumpDuplicates > 0) {
  alert("Pump values must be unique");
  return;
 }

 // Get largest amount and index of that ingredient
 var largestAmount = 0;
 var amountTotal = 0;
 var largestIndex = 0;
 for (var i in ingredients) {
  amountTotal += Number(ingredients[i].amount);
  if (Number(ingredients[i].amount) > largestAmount) {
   largestAmount = ingredients[i].amount;
   largestIndex = i;
  }

  // Append pump numbers to the ingredients
  for (var j in pumps.ingredients) {
   if (ingredients[i].name === pumps.ingredients[j].ingredient) {
    ingredients[i].pump = pumps.ingredients[j].label;
    continue;
   }
  }
 }
After all of this, in the code below, you will see that we get the normalization factor, which is the drinkSize divided by the total amount of all drinks. With this normalization factor, we can multiply the largest amount of drink by this value in order to get the total pump time (since pumps will be running in parallel, the total pump time is the pump time of the ingredient with the highest amount). If you recall from above, this is the $scope.pumpTime that we delayed 200ms to get on the front end. After this, we modify the amounts all of the ingredients in the array based on the normalization factor, and add the delay so that we can top-weight the ingredients in the drink. At the end, we use socket.io to pass the ingredients object to the backend.
> public/javascripts/robot/frontend.js (continuation of makeDrink function)
 // Normalize
 var normFactor = drinkSize/amountTotal;

 var totalPumpMilliseconds = parseInt(normFactor * largestAmount);
 $scope.pumpTime = totalPumpMilliseconds;

 // Set the normalized amount and delay for each ingredient
 ingredients[largestIndex].amount = parseInt(normFactor * Number(ingredients[largestIndex].amount));
 ingredients[largestIndex].delay = 0;
 for (var i in ingredients) {
  if (i === largestIndex) continue;
  ingredients[i].amount = parseInt(normFactor * Number(ingredients[i].amount));
  ingredients[i].delay = ingredients[largestIndex].amount - ingredients[i].amount;
 }

 socket.emit("Make Drink", ingredients);
}
At the backend, app.js catches the “Make Drink” event from the frontend and passes it to the robot portion that handles the actual pumping.
> app.js
var robot = require('./public/javascripts/robot/backend.js');
...
io.sockets.on('connection', function (socket) {
 socket.on("Make Drink", function (ingredients) {
  robot.pump(ingredients);
 });
> public/javascripts/robot/backend.js
exports.pump = function (ingredients) {
 for (var i in ingredients) {
  (function (i) {
   setTimeout(function () { // Delay implemented to have a top-biased mix
    pumpMilliseconds(ingredients[i].pump, ingredients[i].amount);
   }, ingredients[i].delay);
  })(i);
 }
};
And that’s all there is to it!
Well, those are the main points that I wanted to highlight about the software design of the robot. If you have any questions or comments, post them in the comments section below and I’ll try my best to answer them. And, of course, don’t forget to follow me on Twitter: @yujiangtham.
Navigation:
- Part 1: Hardware and Electrical Design
- Part 2: Software Design (you are here)
- Part 3: Operation, Caveats, and Further Modifications
May 30, 2014 at 10:09 pm
Fantastic. I have a very noob issue. After installing everything as instructed, and cloning the git, I try to run the “npm install” command, and have issues.
“install Couldn’t read dependencies
npm ERR! Error: Invalid name: “Bar Mixvah””
The list of errors goes on for a bit, but I wondered if there was something obvious I was missing. Node, Mongo and Git appear to have all been installed successfully.
Thanks, and this is an AMAZING tutorial.
May 30, 2014 at 10:19 pm
Edit: removing the space from the name in the .json file fixed the build issue.
May 30, 2014 at 10:33 pm
Oops! My mistake, I’ve corrected the error and pushed the changes to github. Thanks! If you like the tutorial, let your friends know! 🙂
May 30, 2014 at 11:11 pm
While I eagerly await part 3, can you give me just a hint on assigning 1 ingredient to 1 pump? I will wait if I must 🙂
May 31, 2014 at 8:59 pm
Oh, if you start the server and navigate to the page, you’ll see a PUMP button in the top-right. Click it and click the + button 5 times to add 5 ingredients.
June 1, 2014 at 2:49 pm
When I click on the PUMP button I do not get the ‘ + ‘ option. All I get is an ‘ All ‘ button that when clicked turns to a ‘ stop ‘ button and switches between those two.
Is this due to the fact I do not have an Arduino hooked up yet? Or is there something else going on that I’m missing to add ingredients?
Thanks!
June 1, 2014 at 7:27 pm
Same issue no + button, and I have the Arduino hooked up, but not the pumps yet. Still shipping.
June 2, 2014 at 3:48 pm
We must be missing something then. Because without being able to add pumps, it never displays any drinks in the menu….
June 3, 2014 at 1:01 am
Sorry guys, I’ve been running around in Iceland for the past few days so it’s been hard to push any fixes. Anyway, everything is fixed now, plus I have some more instructions in the readme which you should read if you want to import my current set of example drinks. Pull any changes and note that the database is now barmixvah instead of the old bartagnan db so you’d have to export+import any changes from your old db if you had done any changes to mongo.
After pulling the changes, press the PUMP button and press + to add pumps.
June 3, 2014 at 4:03 am
Works great now! Now to hook it up to an arduino and mod the code a bit to turn on an air pump before running the pumps, as my pumps are going to be valves. Going to see how it works out.
Thanks for all the updates. Much appreciated.
June 2, 2014 at 1:00 pm
Wouldn´t it make sense to let the “drink administrator” choose in which order the ingredients have to be mixed? Some drinks need a special order to give a proper effect (like a B52 e.g.).
And can you give us a hint how to add more pumps? I think the fun starts at around 20-30. 😉
Great project, thank you so much.
June 3, 2014 at 1:03 am
Hey DS, it would make a lot of sense. Unfortunately with my time constraints, I didn’t really have too much time to add it in. You’re welcome to do so if you’d like. Anyway, please read my reply in the thread above for more details on adding pumps. Right now the Arduino should support 12, but if you decide to add another Arduino or perhaps a Arduino MEGA, you should be able to support as many pumps as there are pins.
June 4, 2014 at 2:27 pm
I feel like the next logical progression after building this is to take the computer out of the equation and throw in a Pi and make it a sort of self contained system. Have you attempted this and what issues have you come across if so?
June 5, 2014 at 2:23 pm
Dustin,
I have. I actually this code now running on the Pi. I have Mongo and Node set up, with a working connection to the Arduino. The server starts successfully, and the web UI works. 🙂 I don’t have my pumps yet, but everything seems to be in working order. I would be glad to write up a guide if you are interested. I can hit the make button, and everything seems to be working fine, I just can’t see the results.
June 5, 2014 at 5:22 pm
Very cool! You might want to try just wiring up a simple LED+resistor straight to the correct Arduino pin to see if it will light up. Please do share a guide, as I have no experience with the Pi yet.
June 6, 2014 at 6:44 am
BrokW, I agree with Yu Jiang if you could make the install onto the Pi. as a simple walk through for us noobs it would be great, even a link to a download of your image …… any help would be great
Regards
June 6, 2014 at 7:17 pm
The server doesn’t want to let me post a comment with links, or my comment is too long. Let me try to host the guide somewhere.
-Brock
June 7, 2014 at 10:23 pm
Sounds great, thanks man!
June 11, 2014 at 10:28 am
I second this. Some help getting this working on Pi would be great.
Thanks
June 16, 2014 at 3:14 pm
Sorry I am in the process of moving and didn’t have time to check in.
I agree about the LED resistor to pin setup just to make sure that you are still sending out correct signals while waiting on the pumps. Also, you may need to increase your power supply so it can handle the Pi, Arduino, and 5+ pumps if all are going at the same time. Did you follow the instructions listed to install on Linux to get them on the Pi? I am running Raspian at the moment but can change OS if it makes it simpler for you. Also, let me know if you get a guide hosted.
thanks,
Dustin
December 3, 2017 at 3:49 am
HI , i am using pi zero w .
can u guide me step by step installation of connecting arduino with pi
June 11, 2014 at 10:53 am
I’m having some trouble getting this working. Unfortunately I’m running it on a Windows 7 laptop so not sure if you or someone else would be able to help.
I can get it all working without the Arduino Nano by commenting out the section as you explained and it all appears to work (selecting drinks and sizes, adding cocktails to the database, adding pumps etc).
When I connect up the Arduino and remove the commented section I get the same error as if the Arduino is not connected (see below):
It looks like serialport didn’t compile properly. This is a common problem and its fix is well documented here
https://github.com/voodootikigod/node-serialport#to-install
C:\barmixvah\node_modules\johnny-five\node_modules\firmata\lib\firmata.js:29
throw “Missing serialport dependency”;
^
Missing serialport dependency
Now the Arduino seems to be connected OK. I can upload the standard firmata, I can make the LED blink. I get a USB Serial Port (COM11) showing in devices when I have the Arduino connected.
Anyone know what I’m missing?
Thanks
June 11, 2014 at 2:34 pm
had the same issue on windows 8. make sure you have visual studio installed and then try installing johnn-five with command… npm install johnny-five. Also can you post some good pictures of how you wired it… something is not right with mine.
June 11, 2014 at 5:14 pm
Steve
npm install johnny-five did the trick.
Thanks very much to both of you for the quick reply.
June 12, 2014 at 3:20 am
David. can you post a good picture of how you wired it. My pump is on as soon as I plug the power, before I press the make button. I know I have something wrong but can’t figure it out.
June 12, 2014 at 10:16 am
Steve
Unfortunately I’m only just getting to the hardware part now (last of the bits should arrive tomorrow hopefully).
I’m also using a different pump (the RS-360SH mentioned in a comment on part 1 – http://www.robotstorehk.com/motors/doc/rs_360sh.pdf ) and I’m also going to try a ULN2803A instead of the tip120 transistors just to make my life harder. This is further complicated by having no prior experience with Arduinos or soldering and only extremely basic electronics knowledge 🙂
I’ll try wiring up the first motor with a tip120 as well and if I can get it going I’ll post up a picture.
You could try searching for other examples of motors being driven by an Arduino as there are a lot of examples and they may have some pics and diagrams that may help you find either a problem with what you have connected up or another way of laying it out.
David
June 16, 2014 at 3:19 pm
Steve
I’ve uploaded a pic to dropbox of a single pump working. Hopefully the link works. Tried to get it going with the Darlington Array (UL2803A) without success so did it with just the tip120.
If you look at the pic there are 2 wires on the left edge the Arduino. This is the GRND and one goes to the -ve on my power source (in my can a battery box where I’m only using 2 AAs of the 3 in there) and the other to the 3rd leg on the tip120 (the emitter).
On the right edge there is a resistor from 06 on the Arduino that goes to the 1st leg on the tip120 (the base).
All that’s left s the pump – the +ve goes to the +ve of my power source (via the rail on the breadboard just in case I need to disconnect it – it can go direct). The -ve from the pump goes to the middle leg of the tip120 (the collector).
06 is is the second pump (numbered 1 as the pumps start from 0 on 07) so you can manually activate it when you are in the add/remove pumps menu or just select a drink that has the second ingredient to test.
Hope that helps.
David
June 16, 2014 at 3:20 pm
Link didn’t work too well. Lets try again.
https://www.dropbox.com/sh/evns2d56rsn16ml/AAAhZsR8d-ybviyQwZOO22m3a
August 18, 2019 at 12:41 pm
Do you still have the image of a single pump working? The dropbox link doesn’t work and I’m having trouble placing the pump and power.
June 11, 2014 at 3:50 pm
Ah, sorry, unfortunately I haven’t used Windows in a long time so I can’t be any help here. :/ Maybe try installing the serialport package globally? npm install -g serialport
June 15, 2014 at 9:00 am
Hi BrockW,
did you get any nearer to sorting out the PI posting you were looking for ???
regards
June 24, 2014 at 3:28 pm
I just finished getting this running on my raspberry pi. I’m using 12 pumps along with two ULN2803a transistor arrays.
I didn’t think about doing a write-up when I started, so I will probably start a second pi from scratch and document along the way. Unfortunately the compiling of Mongo and Node can take 4-8 hours. I’ll try to have a guide posted sometime on 6/25. I will also get the image hosted for download as well.
June 26, 2014 at 8:57 pm
Hi Dobbintp, i look forward to your guide and if you get to post an image, I appreciate as going for the 12 pump using the ULN2803a all parts waiting but don’t know enough about the PI yet (learning tho)
July 11, 2014 at 9:18 pm
Hi Dobbintp, did you manage to upload the Pi image anywhere
August 27, 2014 at 11:21 am
Yeah, this would be great. I had everything ready but the Pi. It wont work with the serialport in my case.
June 19, 2014 at 5:39 pm
Yu,
For some reason when people reply I don’t receive a notification of it in my email.
June 23, 2014 at 6:15 am
Hm, not sure why. You might want to check your wordpress account settings for that.
July 2, 2014 at 12:05 am
Ok, while I wait for the pumps to show up I am working on changing the layout of the main page a little. I’ve gotten almost everything the way I want it except for some reason I am unable to change the height of the #cover div. No matter what I do it stays fixed position and takes up the whole browser screen. I can change the width of it all I want but that’s it.
Can someone maybe point me in the direction of why I can’t modify the height of this particular div? I feel like I am missing something really simple here….
Thanks for any help!
July 2, 2014 at 12:31 am
Hey, I believe that the cover height is modified in the frontend.js file (but I can’t remember for certain and I don’t have it in front of me right now). Try checking there.
July 2, 2014 at 4:24 am
That was it! Line 12 of frontend. I knew it had to be simple, not sure how I missed that. Thanks for the prompt reply!
July 2, 2014 at 4:26 am
No problem; best of luck! 🙂
July 7, 2014 at 7:12 pm
When i tried npm install in cmd, nothing happened… Don’t know if i’m doing it wrong or maybe something is missing. i have the git, node and mondogb installed on my computer.
P.S: i’m a beginner 🙂
July 18, 2014 at 9:19 am
ok, so this is something i really want to do and have been considering for a while. While i don’t have a 3d printer i’m a pretty handy guy and can easily build the device. I’ve done carpentry for years and am a year away from a civil engineering degree. However i have absolutely 0 experience in coding or the software that goes with it. Is this still a plausible project for me without that knowledge? thanks so much!
July 25, 2014 at 3:13 am
Hi guys,
It’s the first time that I am using an arduino and I cannot make it work properly. I am on windows 8, I have uploaded Firmata and downloaded git, node and mongo, but when I try to create a sketch and include “git clone https://github.com/ytham/barmixvah.git” I get the following error:
“git does not name a type”
Can someone help me with this please?
Thanks
July 28, 2014 at 1:23 am
It’s ok, I was just not running command prompt as an admin.
August 6, 2014 at 4:43 pm
If I chose to go with a different arduino that has Wi-Fi built in, would it change anything or would all the steps be exactly the same. I’m a total noob at this and not sure if its possible, and if so would it change how it was set up?
August 6, 2014 at 5:37 pm
Hey Buddy, unfortunately I haven’t had experience w/ any other Arduino, but I would imagine that it should be the same. As long as there’s a data link established, I don’t see why wireless/wired should be any different. But again, I haven’t had experience with it so I wouldn’t be able to tell you one way or another. If you do figure it out, I’d love for you to post the steps somewhere for any future explorers to learn from! 🙂
August 12, 2014 at 3:02 am
Hello Yu! I am trying with one pump, but it seems that I have an issue with the code. I get the following error when I activate the pump:
debug – emitting heartbeat for client 4aVLbp6ngszMOoL7yu_V
debug – websocket writing 2::
debug – set heartbeat timeout for client 4aVLbp6ngszMOoL7yu_V
debug – got heartbeat packet
debug – cleared heartbeat timeout for client 4aVLbp6ngszMOoL7yu_V
debug – set heartbeat interval for client 4aVLbp6ngszMOoL7yu_V
I googled the bug and it seems that I need to desactivate “heartbeat” but I do not know how to do it. Any idea?
Thanks,
Manuel
August 12, 2014 at 7:57 pm
Hey, the heartbeat stuff is just stuff that socket.io prints and can be ignored. debug messages are no problem.
August 13, 2014 at 3:08 am
Thank your for your quick reply. Still trying with just one pump but it seems that my wiring is not correct. And I do not manage to upload a pic of my work on GitHub…
August 18, 2014 at 2:23 am
Hi Yu, as I am using an arduino uno, is there something that I should do differently?
Thanks!
August 14, 2014 at 4:50 pm
Great tutorial. But…
I got stuck on “sudo mongod”..
Not that familiar with linux.. Made a new ubuntu (32 bit on an old computer) and followed your guide.
Have tried to install mongodb both from comand line, but also with ubuntu software center.
First I got the “(/data/db) does not exist” so brute force “sudo mkdir -p /data/db/”
Now it goes to “ERROR: addr already in use”….
Is there a installation for dummies on mongodb with setting up the db?
October 1, 2014 at 7:00 am
Have you tried navigating to your home folder and then:
sudo mkdir /data/db/
?
This guide might also help – http://jonpitcherella.com/2013/07/building-a-mean-pi/
September 9, 2014 at 2:52 am
I read a lot of interesting content here. Probably you spend a lot of time writing, i know how to save you a
lot of work, there is an online tool that creates unique, google friendly posts in seconds, just type in google – k2seotips unlimited content
October 2, 2014 at 11:19 am
Hi, very cool project. I appologize in advance if this is a stupid questions but:
I’m trying to install the software on my Linux box now but when i try
“npm install” nothing appear to happen. Then when i try “sudo mongod” it says mongod command not found.
I’m pretty sure mongodb is not installed. I figured “npm install” would do this. Shouldl i install the MEAN stack components seperatly then continue? or am i missing something?
October 30, 2014 at 1:11 am
This is incredible! My friend loves to build robots. I am going to ask him to try this one – I’d really enjoy having a drink mixing robot for weekend cocktails at home.
November 13, 2014 at 11:37 pm
Anyone had any luck with using a raspberry pi yet? And created a image? I would be grateful
December 17, 2014 at 4:29 pm
Hi! I am new on this. But now I can run almost all ok . But the web interface dont work fine, in the part “select s drink” is not showing anything, What can be?
I am trying this project with a motor to move the glass side by side at the same time with the pumps. How you recomend me to do that?
Thanks!!!
January 4, 2015 at 11:57 pm
Hi, I got a problem when à want to launch Localhost:3000, I got this message from Mongod :
You are trying to access MongoDB on the native driver port. For http diagnostic access, add 1000 to the port number
Mongod is launched by this command : sudo mongod –port 3000
can you help me ?
January 7, 2015 at 8:17 am
Interesting content you post here, i have shared this post on my facebook
March 25, 2015 at 4:30 pm
Has anyone made up a list of what’s best for mixes and liquors? Like a setup for rum drinks. A setup for vodka.
April 5, 2015 at 6:29 am
Kind Yu Jiang
How can I run mongodb with Windows 7 command line?
best regards
Giuseppe
May 21, 2015 at 11:50 am
Hi Yu Jiang,
Fantastic tutorial you’ve compiled!
I’m trying to work through the software side of the project (I’m relatively new to all of this) but keep running into an error with mongo. I think I successfully start mongo with the sudo command, and then successfully start the app. When I go to localhost:3000, it all appears to be working, except I can view no drinks (I tried to import your sample collection). Then, when I go to localhost:3000/add, I can attempt to add drinks, but I receive the following message in a dialogue box when I click add:
{“error”:{“name”:”MongoError”}}
Do you have any ideas where I’m going wrong? Any help would be much appreciated!
Thank you,
Thomas Cerier
May 27, 2015 at 1:37 pm
I have this same problem! I’m hoping that somebody can help!
July 12, 2015 at 10:15 pm
I’m trying to run some test drinks and when I add a drink and try to save I get, ” ‘{“error”:{“name”:”MongoError”}}’ , how can I fix this? Was anyone able to get past this?
Thanks.
July 12, 2015 at 10:43 pm
I figured it out. Mongoose is needed to communicate with Mongodb so I needed to install Mongoose via terminal with the command: npm install mongoose
Once it’s installed then you can start Mongo & node app.js and the creation of the drinks will succeed.
Hope this helps anyone else.
May 27, 2015 at 3:46 pm
Hi!
Can anybody please send me a picture of their wiring so I can check with mine. Something is wrong as the bar isn’t detecting the pumps but I’m an amateur and could do with the help!
Oliver
September 22, 2015 at 1:03 pm
I’m having trouble running mongodb on my windows 8 computer. What do I need to type into the command line to start mongo? I did the whole git and npm install, but am stuck on the “sudo mongod” part of the tutorial.
I’ve tried “sudo mongod” “mongod” and a bunch of other random combinations of that.
Any help would be greatly appreciated.
April 17, 2018 at 4:26 pm
i need this info too….
December 18, 2015 at 4:11 am
Hi my name is Sebastian,
I hope you or someone can help me a little. I build your amazing barmixvah, but it seems like I have different/slower pumps. I searched the code for the possibilty to increase the value for the pump time but I am very bad at programming, so I can’t find anything. Maybe you can show me the point where I can change the value so I can play with it to adjust the correct drink amount.
Thank you in adavance.
February 6, 2016 at 6:29 pm
Hello, Mr. Yu Jiang Tham, I am from Wheeler High school and my group and I have decided to take your project and recreate it with modifications of own to present at my school’s STEAM symposium. First, I would like to thank you for putting up your code and explaining them in this very awesome tutorial blog page. Thank you so much! Second, I will be learning javascript and possibly Angular.js in order to understand your code and I was wondering if you had any tips? Any extra knowledge would be greatly appreciated! Third, I would like to credit this project to you and I was wondering how you would like to be credited? Finally, I want to personally say how phenomenal this is because you have given me a fun reason to get into programming. Once again thanks again!
February 23, 2016 at 7:55 pm
Awesome tutorial. One thing, with the pump bias you mention. It is not the amount of liquid that will make the liquid sink, it is the density. Alcohol has lower density than water so pouring the alcohol on top of the OJ is backwards and the alcohol will just sit on top.
February 23, 2016 at 7:58 pm
You can calculate the densities of all liquids by weighing 10ml with a syringe. Water will weigh 10g (1g/ml).
March 20, 2016 at 4:02 am
Hi guys till now everything is running fine untill i click Make
when i click Make error shows up in backend
C:\barmixvah>node app.js
Failed to load c++ bson extension, using pure JS version
info – socket.io started
1458471636273 Device(s) COM17,COM3
1458471636313 Connected COM17
>> [MSG] Bar Mixvah Ready
GET /images/drinks/no_image.jpg 304 2ms
GET /images/drinks/OrangeJuice.jpg 304 2ms
debug – setting request GET /socket.io/1/websocket/aXfQiLy6wuMDD82frwim
debug – set heartbeat interval for client aXfQiLy6wuMDD82frwim
debug – client authorized for
debug – websocket writing 1::
GET / 304 604ms
info – transport end (undefined)
debug – set close timeout for client aXfQiLy6wuMDD82frwim
debug – cleared close timeout for client aXfQiLy6wuMDD82frwim
debug – cleared heartbeat interval for client aXfQiLy6wuMDD82frwim
debug – discarding transport
GET /libs/angular/angular.js 304 4ms
GET /libs/angular-bootstrap/ui-bootstrap-tpls.js 304 8ms
GET /stylesheets/style.css 304 15ms
GET /javascripts/DrinkModule.js 304 24ms
GET /libs/jquery/jquery.min.js 304 16ms
debug – served static content /socket.io.js
GET /libs/bootstrap-css/css/bootstrap.css 304 45ms
GET /stylesheets/overrides.css 304 35ms
GET /javascripts/controllers/DrinkController.js 304 9ms
GET /javascripts/robot/frontend.js 304 12ms
debug – client authorized
info – handshake authorized pobfLS965ATkSJUirwin
GET /images/drinks/no_image.jpg 304 3ms
GET /images/drinks/OrangeJuice.jpg 304 8ms
debug – setting request GET /socket.io/1/websocket/pobfLS965ATkSJUirwin
debug – set heartbeat interval for client pobfLS965ATkSJUirwin
debug – client authorized for
debug – websocket writing 1::
Dispensing Drink
[ { _id: ’56cc3d88970fa6d80d8391f9′,
amount: 18000,
name: ‘Orange Juice’,
‘$$hashKey’: ’00N’,
pump: ‘pump0’,
delay: 0 } ]
[PUMP] Starting pump0
[PUMP] Starting undefined
C:\barmixvah\public\javascripts\robot\backend.js:47
p.on();
^
TypeError: Cannot read property ‘on’ of null
at Object.exports.startPump (C:\barmixvah\public\javascripts\robot\backend.j
s:47:4)
at pumpMilliseconds (C:\barmixvah\public\javascripts\robot\backend.js:38:11)
at null._onTimeout (C:\barmixvah\public\javascripts\robot\backend.js:31:9)
at Timer.listOnTimeout (timers.js:92:15)
please if anyone can solve my error it will be a great help.
Thanks in Advance.
April 5, 2016 at 3:11 pm
I have the same error:
Dispensing Drink
[ { name: ‘Vodka’,
amount: 30000,
_id: ‘536a52f17c74403f2b626e19’,
‘$$hashKey’: ’00T’,
pump: ‘pump0’,
delay: 15000 },
{ name: ‘Cranberry Juice’,
amount: 45000,
_id: ‘536a52f17c74403f2b626e18’,
‘$$hashKey’: ’00U’,
pump: ‘pump2’,
delay: 0 },
{ name: ‘Orange Juice’,
amount: 15000,
_id: ‘536a52f17c74403f2b626e17’,
‘$$hashKey’: ’00V’,
pump: ‘pump3’,
delay: 30000 } ]
[PUMP] Starting pump2
/home/pi/barmixvah/public/javascripts/robot/backend.js:47
p.on();
^
TypeError: Cannot read property ‘on’ of undefined
at Object.exports.startPump (/home/pi/barmixvah/public/javascripts/robot/backend.js:47:4)
at pumpMilliseconds (/home/pi/barmixvah/public/javascripts/robot/backend.js:38:11)
at Timeout._onTimeout (/home/pi/barmixvah/public/javascripts/robot/backend.js:31:9)
at tryOnTimeout (timers.js:224:11)
at Timer.listOnTimeout (timers.js:198:5)
April 12, 2016 at 12:26 pm
I found a solution to the problem
in barmixvah/public/javascripts/robot/backend.js :
var board, pump0, pump1, pump2, pump3, pump4;
var five = require('johnny-five');
board = new five.Board();
board.on('ready', function () {
// Counting down pins because that's the orientation
// that my Arduino happens to be in
pump0 = new five.Led(7);
pump1 = new five.Led(6);
pump2 = new five.Led(5);
pump3 = new five.Led(4);
pump4 = new five.Led(3);
pump9 = new five.Led(9);
board.repl.inject({
p0: pump0,
p1: pump1,
p2: pump2,
p3: pump3,
p4: pump4
});
……
exports.usePump = function (pump) {

  var using;

  switch(pump) {

    case 'pump0':

      using = pump0;

      break;

    case 'pump1':

      using = pump1;

      break;

    case 'pump2':

      using = pump2;

      break;

    case 'pump3':

      using = pump3;

      break;

    case 'pump4':

      using = pump4;

      break;

    default:

      using = pump9;

      break;

  }

  return using;

}
The origin of the problem is here:
default:
using = null;
break;
April 13, 2016 at 12:23 pm
Hi Stéphane,
The modification you suggest does not work for me (replace null by pump9).
It has issues starting whatever pump.
Are you actually testing it on an Arduino ? I have part of the code commented out as I am only testing the interface.
May 16, 2016 at 6:26 am
I have little to no experience with writing code so I apologize in advance, but how realistic is it for me to complete this project? Is it as simple as writing commands in terminal and copying and pasting code?
May 16, 2016 at 4:36 pm
I have a test uno board set up and I have got it to run on my desktop but though I can add pumps and run them . I have no drinks showing to pick from. I am pretty sure I did not enter the data path completley fro mongodb. I told it c:\barmixvah after cloning the git hub to my c: drive. I plan to move to a raspberry PI i loaded the image onto from above but need to understand what I did wrong.
June 2, 2016 at 2:03 am
Hi there, i have to question.
First let me tell you this is an awsome project.
My Bar robot will not be with this 3d printing, Instead it will be made of plexi glass.
Im going to have an raspberry touch screen on the bar.
There is an Arduino Mega running and a Raspberry pi 3.
I also added a description field in the drinks so i can write down if it need some special glass, or lime or something like that.
Now my question, How can i calculate or find out the ratio for drink mix. I’m no expert of this, but for example when manual mixing let say redbull & vodka i mix 4cl vodka and the rest is redbull.
How do i know how the ratio for that will be?
Hope someone can help me,
Best regards
Andreas
January 8, 2018 at 10:18 am
i tried to install barmixwh on raspberry pi 3 but i can not do it.
is it possible to have the procedure or image iso or img to install it
thanks you
November 25, 2016 at 8:17 pm
This project looks awesome, thanks for putting together such a great blog. I was wondering how your serving the site to other computers on your network. I know your computer is running the MEAN stack app, but is it also running it on an nginx/apache server so other machines on the network can use it as well? Or is the computer connected to the arduino the only one capable of making drink orders?
September 28, 2017 at 1:31 pm
I have problems after install on Windows 10, “Error unhandled socket.io Url”
the Solution: You need install this version of Socket.io: 1.0 in Windows Shell or CMD.exe open the folder on you project.
npm install socket.io@1.0
Everithing is finne now.
November 19, 2017 at 3:37 pm
I keep getting this error, does anyone have a fix?
Code:
the_catster@TheCatstersHackerSpace:~/barmixvah$ node app.js
{ [Error: Cannot find module ‘../build/Release/bson’] code: ‘MODULE_NOT_FOUND’ }
js-bson: Failed to load c++ bson extension, using pure JS version
info – socket.io started
events.js:141
throw er; // Unhandled ‘error’ event
^
Error: failed to connect to [localhost:27017]
at null. (/home/the_catster/barmixvah/node_modules/mongodb/lib/mongodb/connection/server.js:556:25)
at emitThree (events.js:97:13)
at emit (events.js:175:7)
at null. (/home/the_catster/barmixvah/node_modules/mongodb/lib/mongodb/connection/connection_pool.js:156:15)
at emitTwo (events.js:87:13)
at emit (events.js:172:7)
at Socket. (/home/the_catster/barmixvah/node_modules/mongodb/lib/mongodb/connection/connection.js:534:10)
at emitOne (events.js:77:13)
at Socket.emit (events.js:169:7)
at emitErrorNT (net.js:1256:8)
at nextTickCallbackWith2Args (node.js:441:9)
at process._tickDomainCallback (node.js:396:17)
April 18, 2019 at 3:33 am
Great tutorial. Interesting content you post here, keep posting