This is a continuation of the previous post where I went over how to print, wire, solder, and assemble the robot. With this post, I will be discussing the software design of the robot, as well as the considerations that I took in designing it. I’m assuming that you have some working knowledge of JavaScript and MongoDB. I realize that the Angular.js code that is written here may not be the most efficient, since the whole point of me building the robot was to learn Angular (and also make some thing awesome). Therefore, if you spot any changes that need to be made to the code to increase efficiency or whatnot, please let me know in the comments or send a pull request to the Bar Mixvah GitHub. Here’s a video of the robot in case you missed the previous post:
Navigation:
- Part 1: Hardware and Electrical Design
- Part 2: Software Design (you are here)
- Part 3: Operation, Caveats, and Further Modifications
Why the MEAN Stack
So, before I proceed, a few people have asked why we need so much technology to do something so simple as mixing drinks. What is the MEAN stack? It consists of MongoDB, Express.js, Angular.js, and Node.js. Everything works beautifully together because it’s all JavaScript (and MongoDB, which uses BSON, similar to JavaScript’s JSON). Why do we need the MEAN stack? Well, we don’t need it. But it makes things easier, so that’s why I’m using it.
- MongoDB is used to store all of the drink and pump information
- Express.js is the web server so that your WiFi connected devices can access the interface
- Angular.js is used on the front end to filter drinks based on what ingredients have been selected
- Node.js is used on the backend to communicate with the Arduino
Preparing Your Arduino
The Arduino Nano talks to the Johnny-Five node.js package via the Standard Firmata protocol. You will need to flash Standard Firmata onto your Arduino:
- Download the Arduino software
- Plug in the Arduino to your USB port on your computer
- Open the Arduino software
- Go to File > Examples > Firmata > StandardFirmata
- Click the Upload button in the top-left

Starting the App
Bar Mixvah requires node.js, MongoDB, and git. Follow the respective links to download and install them if you haven’t already. The commands here are run in the Mac OS or Linux shell; I don’t have much experience with the Windows command line, but I believe most of the stuff is the same (except you should remove sudo if you see it, and run your command prompt as an administrator). To start off, clone the Bar Mixvah GitHub repository onto your local hard drive:
git clone https://github.com/ytham/barmixvah.git
cd into the directory and install all node.js packages:
cd barmixvah
npm install
This will install all of the packages required for the node.js app to run. Before you can run it, you must start mongodb:
sudo mongod
In a new terminal window, cd to the barmixvah directory again. Plug in the Arduino to your computer via USB. You can now start the robot app:
node app.js
Congrats! It should now be up and running. You can now point your web browser to http://localhost:3000 to check it out. The rest of this post will go towards explaining the code for the robot. If you haven’t yet set up the Arduino, you can read the next section to set up the UI without having it connected to an Arduino for testing purposes.
Debugging the App Without the Arduino
The app can be started without an Arduino by commenting out the following section:
> public/javascripts/robot/backend.js
var board, pump0, pump1, pump2, pump3, pump4;
/*
var five = require('johnny-five');

board = new five.Board();
board.on('ready', function () {
 // Counting down pins because that's the orientation
 // that my Arduino happens to be in
 pump0 = new five.Led(7);
 pump1 = new five.Led(6);
 pump2 = new five.Led(5);
 pump3 = new five.Led(4);
 pump4 = new five.Led(3);

 board.repl.inject({
  p0: pump0,
  p1: pump1,
  p2: pump2,
  p3: pump3,
  p4: pump4
 });

 console.log("\033[31m[MSG] Bar Mixvah Ready\033[91m");
});
*/
This will prevent Johnny-Five from initializing the Arduino. This is useful for testing UI or backend code on the go if you’re not tethered to an Arduino.
General Flow
Here’s a pretty simplified design that gives you a general picture of how the code works with the physical elements:
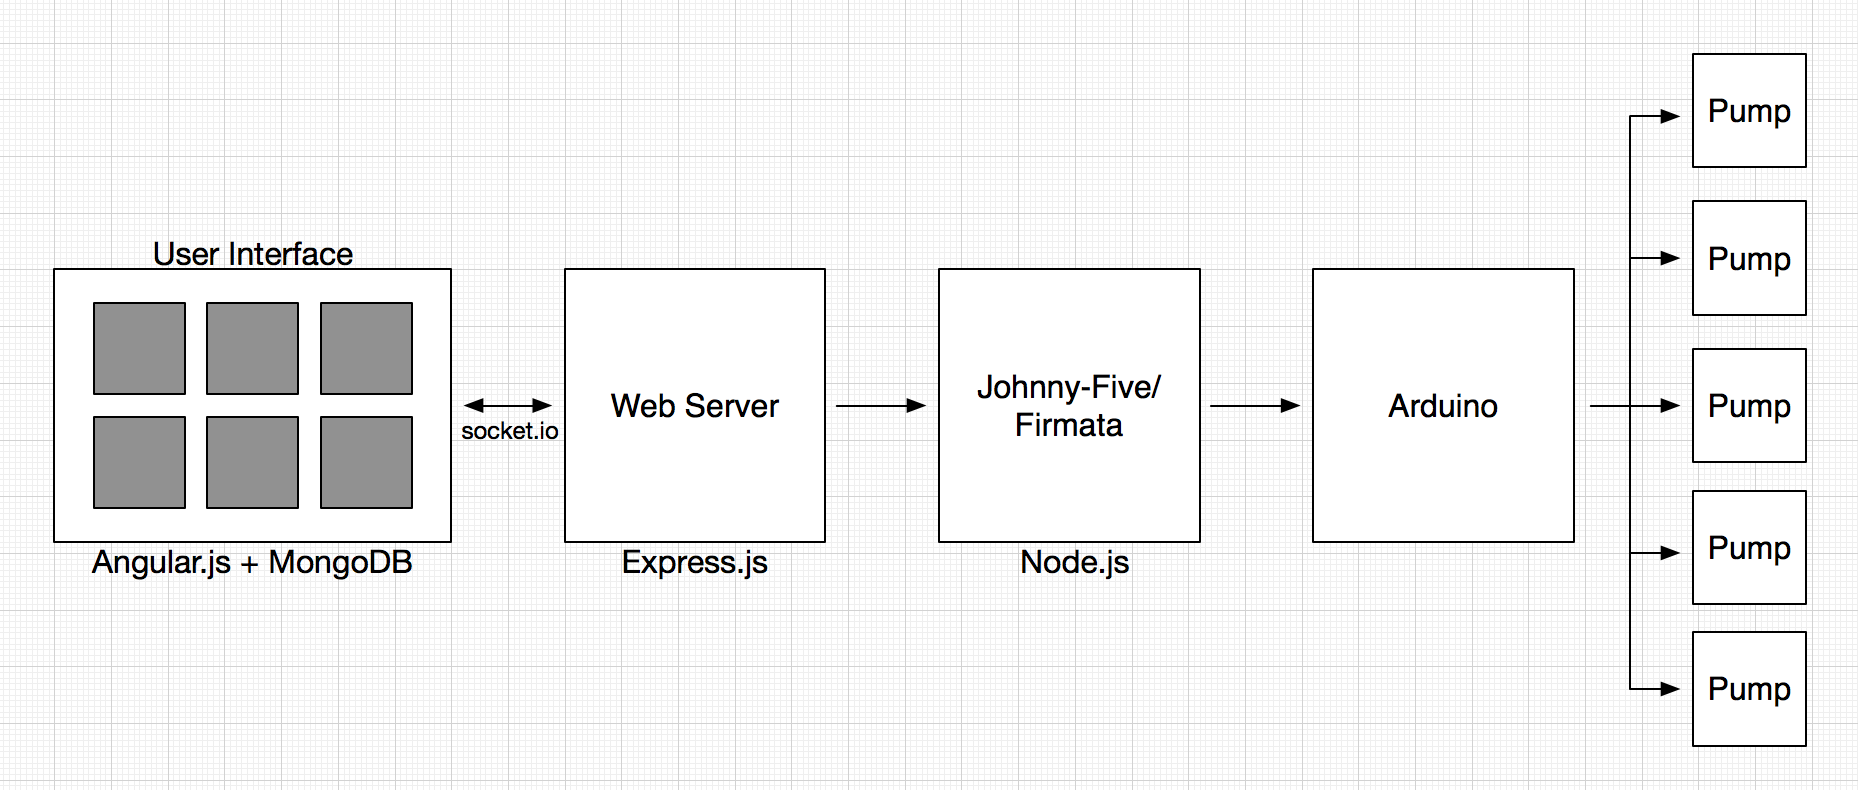
When a user interacts with the UI, Angular.js (or some custom JavaScript/jQuery) will change what is displayed on the screen. If the user decides to make a drink with the Make button, the selected drink JS object and drink size are passed to the backend via socket.io. From there, the app passes the data to the Johnny-Five package and communicates when to start/stop the array of pumps.
Drink and Pump Schemas
The drink schema that will be saved into MongoDB (via the Mongoose node.js package) is specified below:
> models/Drink.js
exports.DrinkSchema = new Mongoose.Schema({
 name: { type: String, required: true },
 image: { type: String, required: false },
 ingredients: [{
  name: String,
  amount: Number
 }]
});
The drink objects have a name, image, and an array of ingredient objects that contain the their name and relative amount. Ingredient amounts are relative and unitless because then the user can specify the drink size and get the actual amount of each ingredient to pump based on the specified drink size.
Here is the pump schema:
> models/Pump.js
exports.PumpSchema = new Mongoose.Schema({
 label: { type: String, unique: true, sparse: true, required: true },
 ingredients: [{
  label: String,
  ingredient: String
 }]
});
We have one pump object that contains an array of pumps that have a label (such as “pump0”, “pump1”, etc…) and an ingredient associated with that pump. In this case, we use the label because order is important and we want to ensure that the pumps are in the correct order regardless of how they are modified. When any pump is updated via the UI, the entire pump object that contains all of the (up to five) pumps is updated in MongoDB. This keeps things consistent and ensures that pumps are updated correctly.
> routes/index.js
exports.updatePump = function (Pump) {
 return function (req, res) {
  Pump.findOneAndUpdate({ _id: req.body._id },
   {
    ingredients: req.body.ingredients
   },
  function (err, pump) {
   if (pump == null) {
    Pump.create(req.body);
    pump = req.body;
   }
   res.send(pump);
  });
 }
}
Choosing Pumps
The pump system is set up so that as soon as the any of the pump ingredients are changed, the entire pumps object (containing all of the individual pump ingredients) is changed. The ng-click directive in this case calls two functions. One function saves the pumps object by overriding the previous pumps object, the other figures out the number of duplicate ingredients and writes the number of duplicates that are checked at other times (such as when the Make button is pressed). The reason why we don’t just check pumps for duplicates immediately is if, say you are a user and you want to move “Orange Juice” from pump0 to pump2. You might change pump2 to “Orange Juice” first, but if that throws an error since “Orange Juice” is also currently on pump0, that is not a very good user experience.
> views/index.jade
div.pumpContainer(ng-repeat="pump in pumps.ingredients")
 select.mixers(ng-change="savePumpValue($index); writeNumDuplicates()", ng-model="pump.ingredient", ng-options="i for i in ingredientsList")
The savePumpValue function sends a post request with the $scope.pumps object. The pumps object is data bound to the view via Angular, so the changes in the dropdown are automatically modified on the front end, but we just need to save it into the database so that when the user refreshes the page, they get the same pumps instead of having to start over.
> public/javascripts/controller/DrinkController.js
$scope.savePumpValue = function (pumpNumber) {
 $http.post('/updatepump.json', $scope.pumps).success(function (data) {
  if (data) {
   console.log(data);
  }
 });
};
From here, the web server receives the HTTP POST request via the updatepump.json endpoint.
> app.js
var routes = require('./routes/index');
...
app.post('/updatepump.json', routes.updatePump(Pump));
And then the updatePump function is run, creating a pump if there is none, and updating the current pumps object if it already exists.
> routes/index.js
exports.updatePump = function (Pump) {
 return function (req, res) {
  Pump.findOneAndUpdate({ _id: req.body._id },
  {
   ingredients: req.body.ingredients
  },
  function (err, pump) {
   if (pump == null) {
    Pump.create(req.body);
    pump = req.body;
   }
  res.send(pump);
  });
 }
}
Pump Operation
The pumps are switched on/off by the 5V from the Arduino pins going to the each of the TIP120 transistors, which in turn switch the 12V for the individual pumps. Since the Johnny-Five package contains a simple interface for LEDs, I decided to use its switch on/off properties for switching the pumps because it’s just a simple digitalWrite(HIGH/LOW). Here’s the code for it:
> public/javascripts/robot/backend.js
 pump0 = new five.Led(7);
 pump1 = new five.Led(6);
 pump2 = new five.Led(5);
 pump3 = new five.Led(4);
 pump4 = new five.Led(3);
The pumpMilliseconds function is used to run a single pump for a number of milliseconds. The usePump function (not shown here) determines which pump to use based on the pump input string.
> public/javascripts/robot/backend.js
function pumpMilliseconds(pump, ms) {
 exports.startPump(pump);
  setTimeout(function () {
 exports.stopPump(pump);
 }, ms);
}

exports.startPump = function (pump) {
 console.log("\033[32m[PUMP] Starting " + pump + "\033[91m");
 var p = exports.usePump(pump);
 p.on();
}

exports.stopPump = function (pump) {
 console.log("\033[32m[PUMP] Stopping " + pump + "\033[91m");
 var p = exports.usePump(pump);
 p.off();
}
Making a Drink
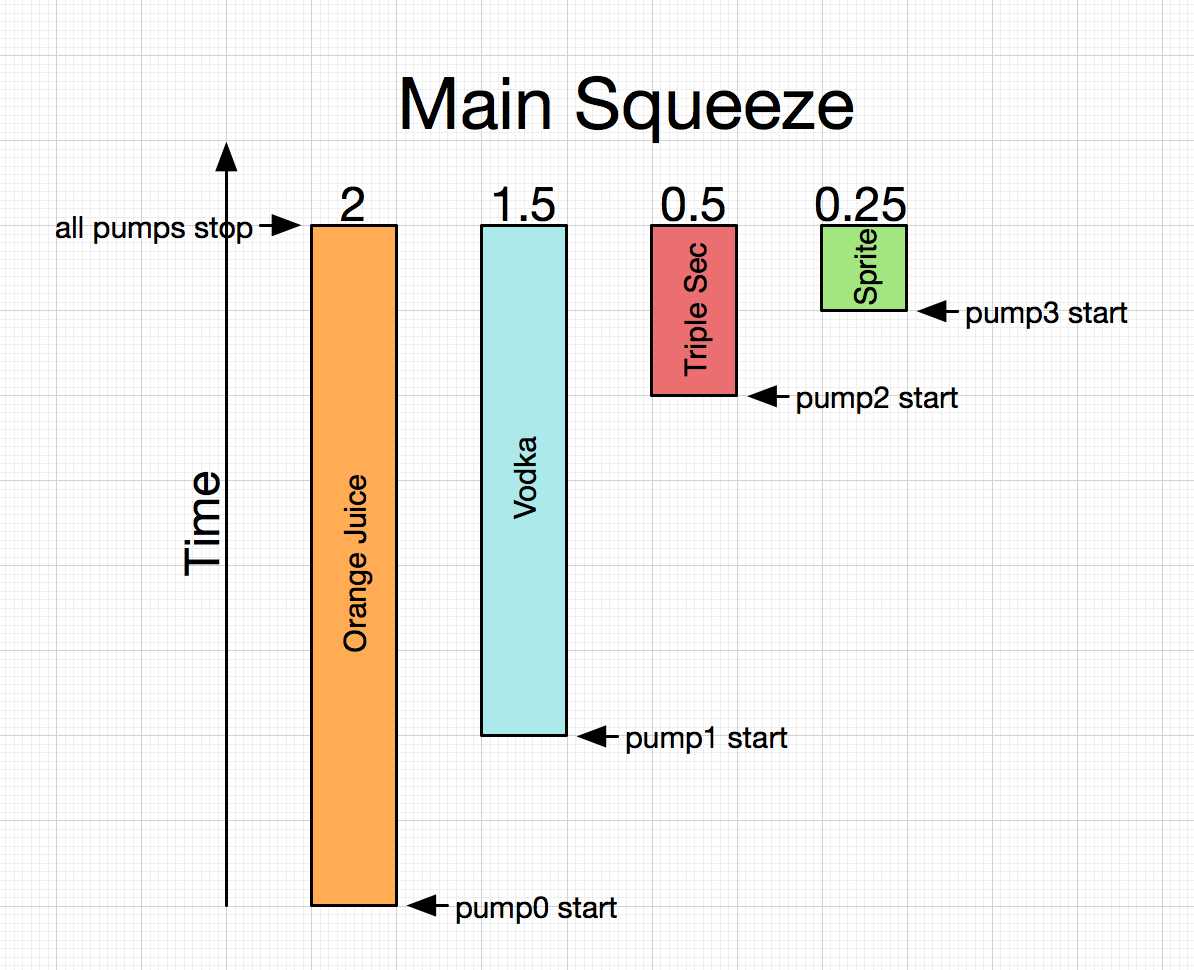
The simplicity of the UI hides much of the complexity behind the actual making of a drink. We want to make a drink that is top-biased in terms of ingredients. That is, all of the ingredients with smaller amounts should be on top so that gravity will cause them to mix into the drink. This adds a little bit of complexity in that we need to also pass a delay amount for each pump, but it is worth it for a drink that is mixed better! Here’s a diagram of how the pump timings will work out:
When the user picks a drink and size, the data is stored as a local variable in the Angular $scope.
views/index.jade
div.drinkContainer(ng-repeat="drink in drinks | orderBy: 'name' | filter: containsIngredients", ng-click="selectDrink(drink)")
public/javascripts/controllers/DrinkController.js
$scope.selectDrink = function (drink) {
 $scope.selectedDrink = drink;

 if ($scope.lastSelected) {
 $scope.lastSelected.selectedDrink = '';
 }

 this.selectedDrink = 'selectedDrink';
 $scope.lastSelected = this;
};
The Angular ng-click directive in the jade template file specifies the function to be run in the Angular $scope when the div is clicked. In this case, when the div is clicked, the $scope.selectedDrink variable gets set to the current drink object. When the Make button is pressed, code on frontend.js does two things: 1) it does some visual trickery to turn the Make button into a progress bar, and 2) it does the calculations required to determine how long each of the pumps should fire for based on the ingredients in the drink and the size of the drink selected. So, here’s the code for what happens when we tap the Make button:
> public/javascripts/robot/frontend.js
$('#make').on('click touch', function () {
 if ($('#make').hasClass('noselection') === true) {
  alert('Please select a drink first.');
 return;
 }

 if ($('#make').hasClass('disabled') === true) {
  return;
 }
First, we double check to make sure that a drink has been selected first. We can’t make anything if there is no selected drink. Additionally, if the robot is already making a drink, the Make button will be disabled and should not make a drink until it is done with the drink it is already making. Next, in the following code, you’ll see how we do the visual progress bar for the Make button. We add the ‘disabled’ class to prevent additional drinks from being made until the current one is done, show the hidden #makeProgress div, and then animate it via its margin-left style. At the end of the animation, the anonymous callback function hides the makeProgress bar and removes the ‘disabled’ class. The whole thing is wrapped around a 200ms delay in order for us to get the $scope.pumpTime, which is calculated in the makeDrink function that is explained further down in this section. After this, we call the makeDrink function with the drink’s ingredients, the pumps, and the selected drink size ($scope.drinkTime).
> public/javascripts/robot/frontend.js (continuing $('#make').on...)
 console.log('Making Drink');
 $('#make').addClass('disabled');
 $('#makeProgress').show();
 setTimeout(function () {
  console.log("Time to Dispense Drink: " + $scope.pumpTime + "ms");
  $('#makeProgress').animate({
   'margin-left': String($(window).width()) + 'px'
  }, parseInt($scope.pumpTime), 'linear', function () {
   $('#make').removeClass('disabled');
   $('#makeProgress').hide();
   $('#makeProgress').css('margin-left', '-10px');
  });
 }, 200);

 // Start dispensing drink
 makeDrink($scope.selectedDrink.ingredients, $scope.pumps, parseInt($scope.drinkTime));
 });
The code below goes through getting the total amount of all of the ingredients, finding the ingredient with the largest amount, and also appending pump labels to the ingredients as a string so that we will be able to determine which pump to use after this data is sent to the backend.
> public/javascripts/robot/frontend.js
function makeDrink(ingredients, pumps, drinkSize) {
 // Check that there are no duplicate pumps ingredients
 if ($scope.pumpDuplicates > 0) {
  alert("Pump values must be unique");
  return;
 }

 // Get largest amount and index of that ingredient
 var largestAmount = 0;
 var amountTotal = 0;
 var largestIndex = 0;
 for (var i in ingredients) {
  amountTotal += Number(ingredients[i].amount);
  if (Number(ingredients[i].amount) > largestAmount) {
   largestAmount = ingredients[i].amount;
   largestIndex = i;
  }

  // Append pump numbers to the ingredients
  for (var j in pumps.ingredients) {
   if (ingredients[i].name === pumps.ingredients[j].ingredient) {
    ingredients[i].pump = pumps.ingredients[j].label;
    continue;
   }
  }
 }
After all of this, in the code below, you will see that we get the normalization factor, which is the drinkSize divided by the total amount of all drinks. With this normalization factor, we can multiply the largest amount of drink by this value in order to get the total pump time (since pumps will be running in parallel, the total pump time is the pump time of the ingredient with the highest amount). If you recall from above, this is the $scope.pumpTime that we delayed 200ms to get on the front end. After this, we modify the amounts all of the ingredients in the array based on the normalization factor, and add the delay so that we can top-weight the ingredients in the drink. At the end, we use socket.io to pass the ingredients object to the backend.
> public/javascripts/robot/frontend.js (continuation of makeDrink function)
 // Normalize
 var normFactor = drinkSize/amountTotal;

 var totalPumpMilliseconds = parseInt(normFactor * largestAmount);
 $scope.pumpTime = totalPumpMilliseconds;

 // Set the normalized amount and delay for each ingredient
 ingredients[largestIndex].amount = parseInt(normFactor * Number(ingredients[largestIndex].amount));
 ingredients[largestIndex].delay = 0;
 for (var i in ingredients) {
  if (i === largestIndex) continue;
  ingredients[i].amount = parseInt(normFactor * Number(ingredients[i].amount));
  ingredients[i].delay = ingredients[largestIndex].amount - ingredients[i].amount;
 }

 socket.emit("Make Drink", ingredients);
}
At the backend, app.js catches the “Make Drink” event from the frontend and passes it to the robot portion that handles the actual pumping.
> app.js
var robot = require('./public/javascripts/robot/backend.js');
...
io.sockets.on('connection', function (socket) {
 socket.on("Make Drink", function (ingredients) {
  robot.pump(ingredients);
 });
> public/javascripts/robot/backend.js
exports.pump = function (ingredients) {
 for (var i in ingredients) {
  (function (i) {
   setTimeout(function () { // Delay implemented to have a top-biased mix
    pumpMilliseconds(ingredients[i].pump, ingredients[i].amount);
   }, ingredients[i].delay);
  })(i);
 }
};
And that’s all there is to it!
Well, those are the main points that I wanted to highlight about the software design of the robot. If you have any questions or comments, post them in the comments section below and I’ll try my best to answer them. And, of course, don’t forget to follow me on Twitter: @yujiangtham.
Navigation:
- Part 1: Hardware and Electrical Design
- Part 2: Software Design (you are here)
- Part 3: Operation, Caveats, and Further Modifications