I built a robot that mixes drinks named Bar Mixvah. It utilizes an Arduino microcontroller switching a series of pumps via transistors on the physical layer, and the MEAN stack (MongoDB, Express.js, Angular.js, Node.js) and jQuery for the frontend and backend. In this post, I’ll teach you how I made it. You can follow along and build one just like it! I’ve also put the 3d model (blender), stl files, and the code up on GitHub for you guys to download. See the link at the bottom of the page. Here’s the video of the robot:
Navigation:
- Part 1: Hardware and Electrical Design (you are here)
- Part 2: Software Design
- Part 3: Operation, Caveats, and Further Modifications
First, a little bit more about the robot. The entire thing costs approximately $180 to make. All of the parts are 3d printed, so you’ll need a 3d printer to build this. I used the MakerBot Replicator 2X, but any 3d printer should do. Total time to print the pieces is about 18 hours, depending on your settings, and assembly wiring, and Here’s a list of parts that need to be purchased:
- 5x 12V DC peristaltic pumps
- 11x 5/16″ steel square 12″ rods
- Clear tubing
- Arduino Nano
- 5x TIP120 w/ Diodes
- 400-point breadboard and jumper wire
- 5x 2.2kOhm resistor
- 4x #6-32 2″ machine screws
- 10x #4-40 3/4″ machine screws
- 12V power supply rated at (or greater than) 1.5A – or you can use an old laptop power supply (as long as it’s 12V DC).
- 5.5mm x 2.1mm coaxial power connector (female) – or if you’re using a laptop power supply, 5.5mm x 2.5mm
- Male pin connectors
- Female housing for the male pin connectors
Other tools required for the job are: a hacksaw to cut two of the 12″ rods in half, a wire stripper, soldering iron, and solder to connect the wire to the pin connectors and coaxial power connector, and a multimeter to check your work.
For the first part of this tutorial, I’ll focus on the 3d model, printing, and assembling the physical robot. The second part of the tutorial deals with the code, and the third part will deal with the operation of the robot.
Design
Bar Mixvah is designed to use a system of 5 peristaltic pumps that are switched by 5 bipolar junction transistors (TIP120), all controlled by an Arduino, which itself is controlled by the Johnny-Five package on the node.js/express web server that is running on your laptop/windows tablet (or maybe Raspberry Pi? I haven’t tried). Having it on a web server allows users to order from any device, be it a phone, tablet, or other laptop that can connect to your WiFi access point’s internal network. Practicality-wise, maybe it’s not necessary. However, in my experience, people seem to enjoy ordering from a tablet that they’re holding in their hands more than a stationary screen attached to the robot.
The physical design of Bar Mixvah around the usage of 5/16″x12″ steel rods. I chose this length and size because they’re sturdy, readily available at your local hardware store, and not too big or small. They’re also relatively cheap at ~$2-3 per piece, depending on where you buy from. The problem with 3d printing is that it’s goddamn slow. If you want to build a medium sized robot like this one, it would take days to print all of the necessary parts. In fact, you don’t even need to print these parts; you could fasten them together using plenty of other methods. However, I don’t have access to a metal shop, am a terrible welder, and wanted a friendly looking robot, so I chose this combination of 3d printing the joints and connecting them via metal shafts.
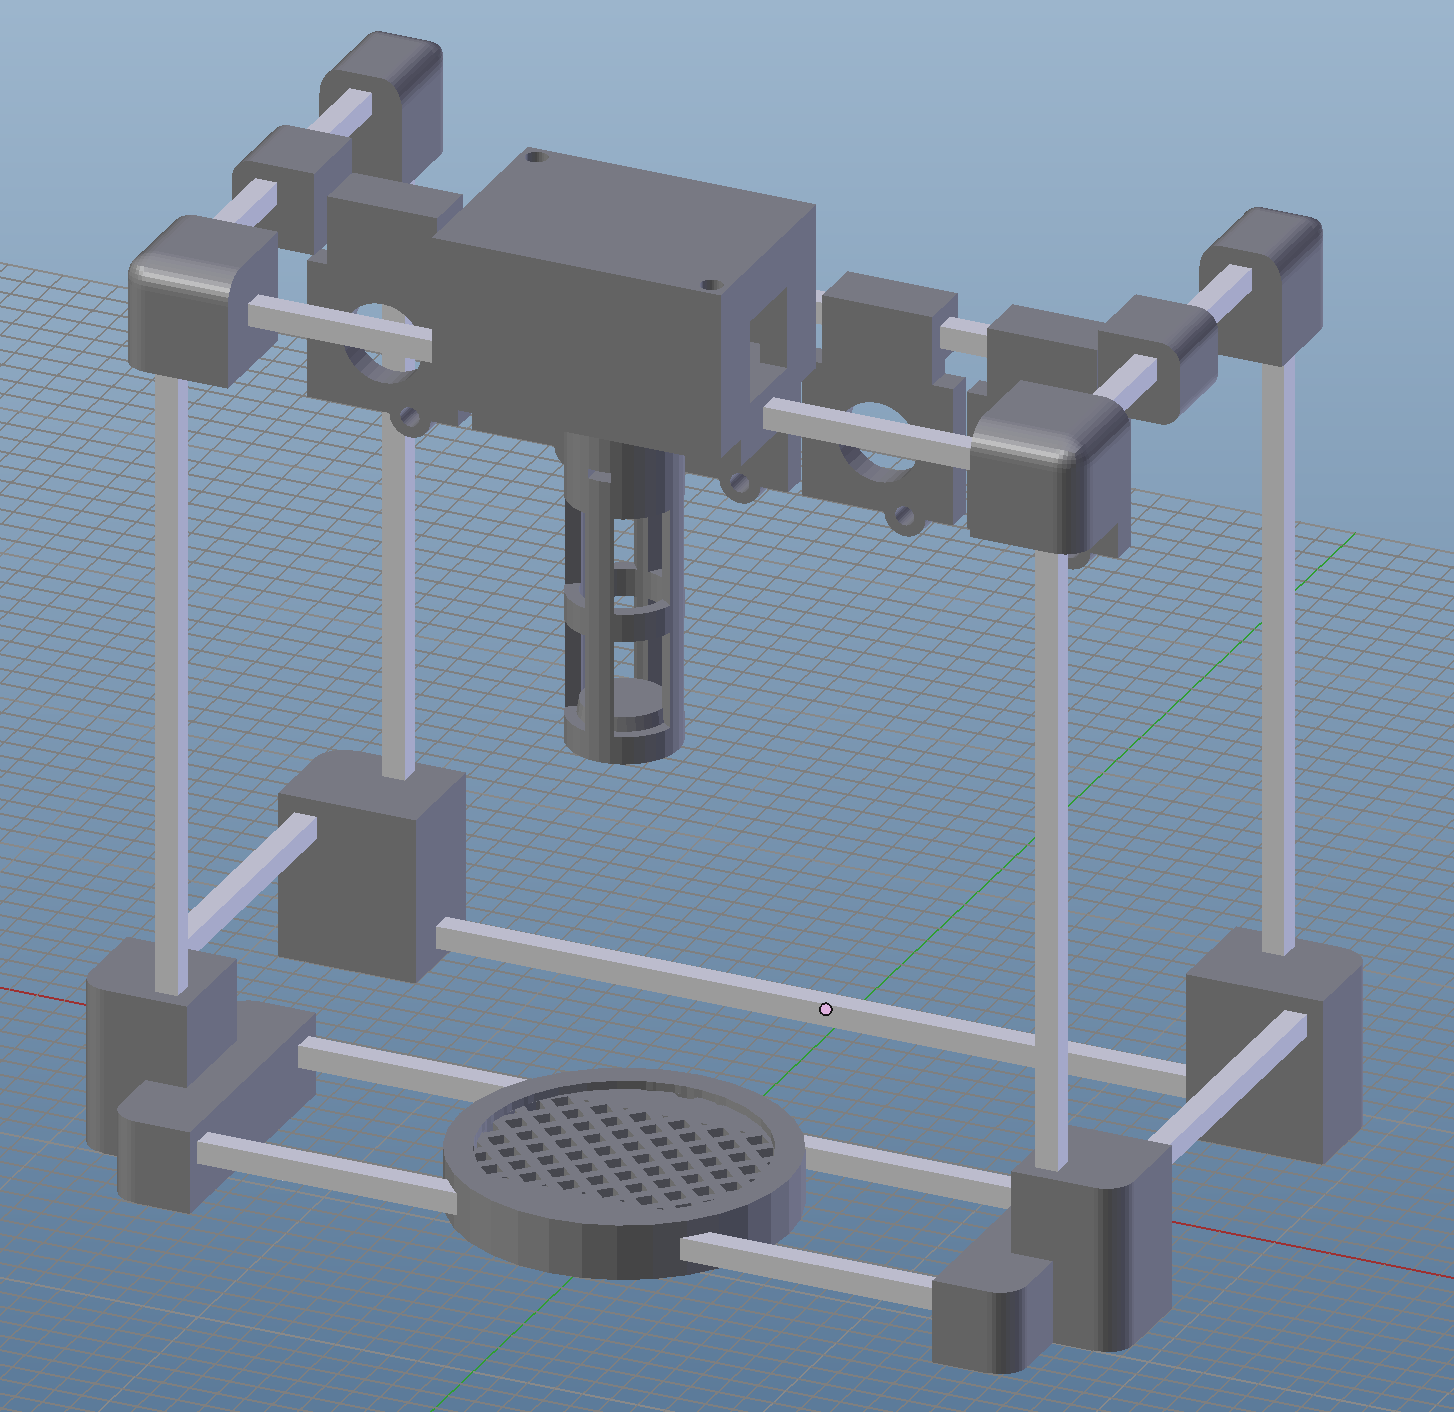
Here’s a screenshot of the 3d model, which, fortunately, looks exactly like the real thing after I finished building it. Ah, the miracles of science!
Printing the Parts
The stl files can mostly be printed in the orientation that they are in, however two files should be rotated 180 degrees on the x-axis so that they can be printed without major supports. These two pieces are Center – Board Cover – Top.stl and Center – Common Drink Channel.stl. Additionally, Center – Pump Holder.stl should be printed flat by rotating it 90 degrees so that no support pieces are needed. You will need to turn on printing with supports to ensure that the holes where we will be inserting the 5/16″ steel rods are printed to the right size.
One more thing that has been brought to my attention: the .stl files are may be 10x smaller than they should be in your 3d printing software. If that’s the case, you will need to scale up the objects 10x in all dimensions. It seems to happen regardless of the 3d software that I use when I convert to .stl. No idea why.
The Peristaltic Pumps
What is a peristaltic pump? If the word sounds familiar to you, it’s because you most likely heard of peristalsis in one of your biology classes at some point in time. Peristalsis is the system that your body uses to swallow food. Your throat muscles contract and relax in a way to create a waveform that pushes food in your throat down into your stomach. Peristaltic pumps work on the same principle, albeit with a slightly different execution. The clear plastic tube extends through the pump, and rollers propelled by a DC motor create a waveform that pushes liquid through the tube. Peristaltic pumps are safe and hygienic because liquid never actually contacts any part of the pump; only the plastic tubing is ever in contact with the liquid.
The peristaltic pumps come with some very short plastic tubing. This is obviously inadequate for our current application, so we’ll have to replace the plastic tubing. This requires us to take apart the pump. Fortunately, this is not a hard thing. Instead of trying to explain it, you can view the following video to figure out how it is done.
Soldering
Before connecting any wires, you’ll want to do all of the soldering. You’ll have to solder the 5.5mm x 2.1mm coaxial power connector to two jumper wires, one for the positive lead and one for the negative lead. Plug in your 12V DC power supply to the wall, then plug the coaxial power connector into the DC power supply. Use your multimeter to find out which lead is positive and negative by placing the probes on two of the leads until you find that the multimeter says 12V; those are you positive and negative leads (if it says -12V, then you’ve got the positive and negative leads switched). Unplug the coaxial power connector. Strip two wires and solder one to each of the coaxial power connector’s leads. After you’re done soldering, wrap any exposed metal around the leads in electrical tape.
Next, you’ll want to solder wires to the leads of the peristaltic pumps. The positive lead of the pump should be labeled, so you should not need to guess. If it is not labeled, you will just need to make note of which way the pump is turning and make sure that all of them are turning in the same direction. Don’t worry about the polarity of the leads on the pump breaking anything, since connecting them backwards will just make the pump go in the opposite direction. However, I want to emphasize that you’ll probably want to ensure all of the pumps are pumping clockwise (if they are facing you; you can see through the tiny circle in the middle which direction they are pumping when turned on). After this is done, once again wrap the leads in electrical tape.
Wiring
Here’s where it gets a little bit tricky. The actual wiring is not too complicated, but it requires a little bit of finesse due to the confines of space that we are working with. Since we are fitting everything on a single breadboard, we need to ensure everything is placed in the right spot.
In case you haven’t used a breadboard in a while, each of the numbers running down the breadboard indicate an individual node. The center divides the two sides, so they are separate nodes. The (+) rail running up the left and right side of the breadboard is one node per side, and it is the same with the (-) rail.
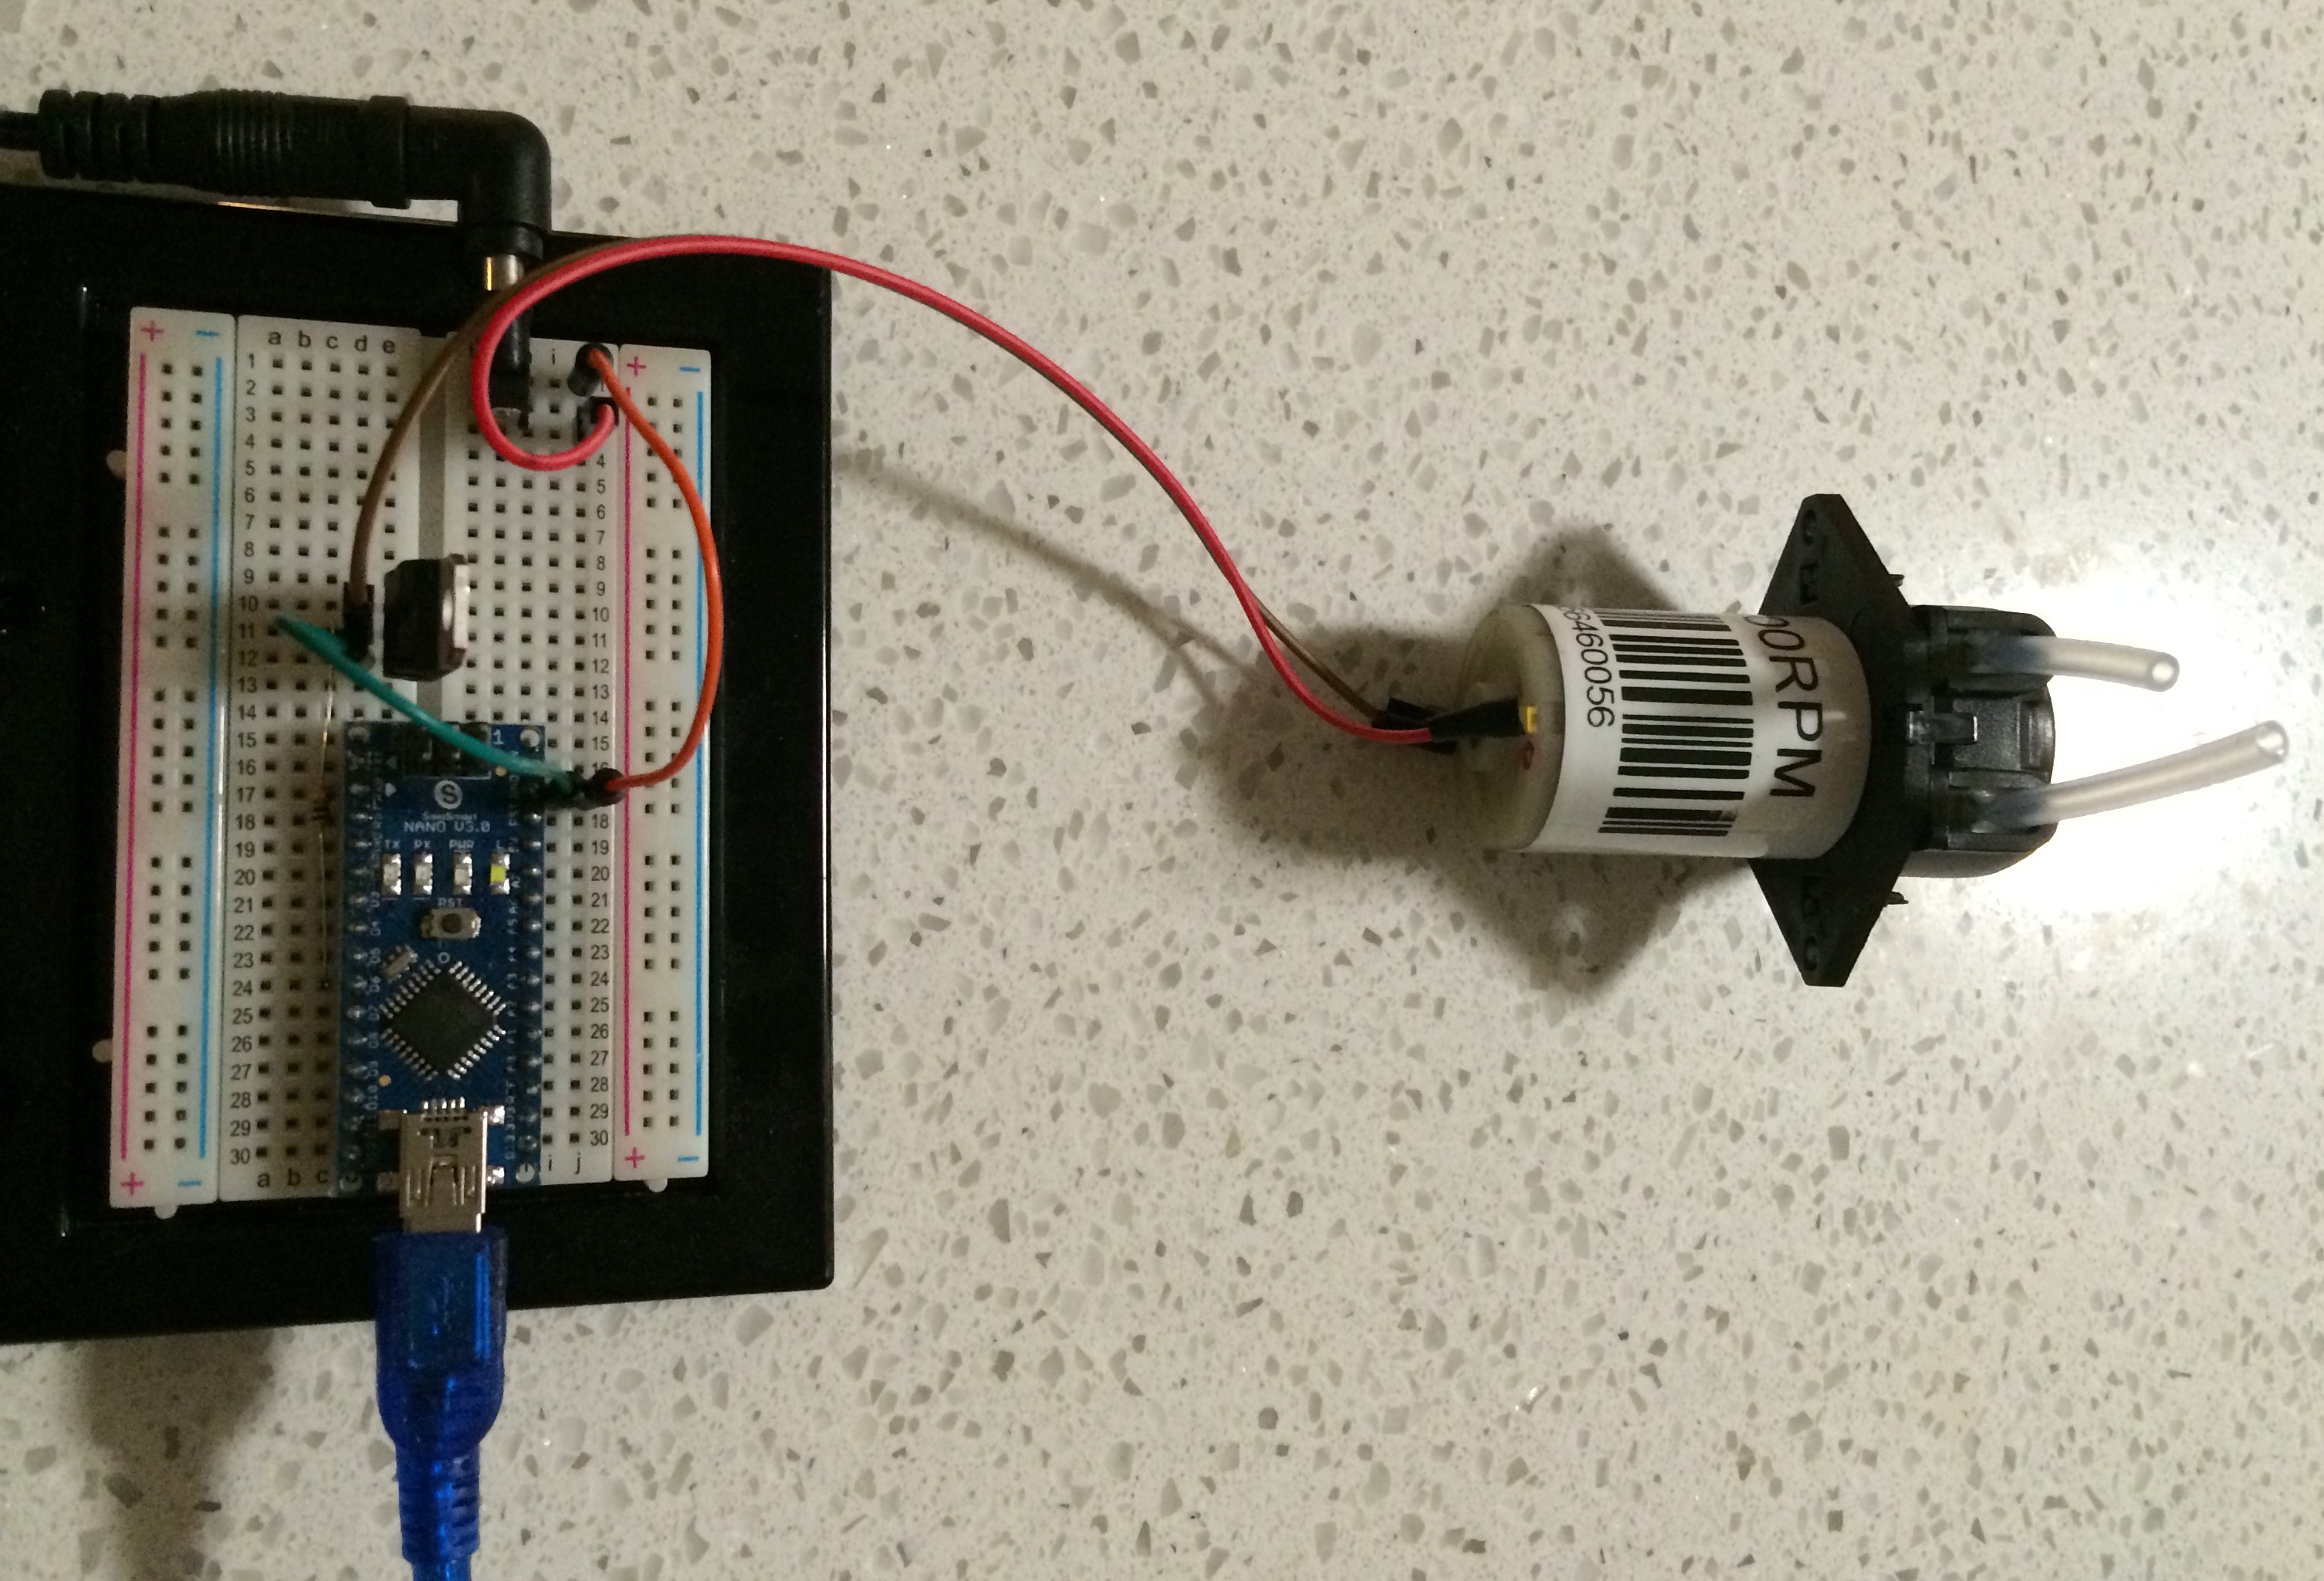
The first thing that you should do before getting any wiring done is to hook up your pumps individually and ensure they are all working. The photo below shows a little bit more complex of a circuit. To check if it’s working, you can just connect the coaxial power connector and pump on a breadboard and plug in the power and ensure that the pump works.
Here’s the wiring diagram for the robot. As you can see, it’s relatively simple:

The tough part is that there is not much space, so you may need to have a set of needle-nosed pliers ready to put some of the things in. I recommend adding everything except transistors in first. Here’s how my breadboard looked like after I finished wiring it up:
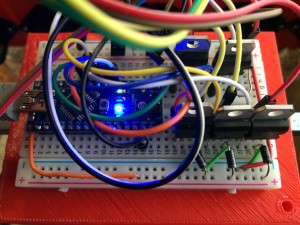
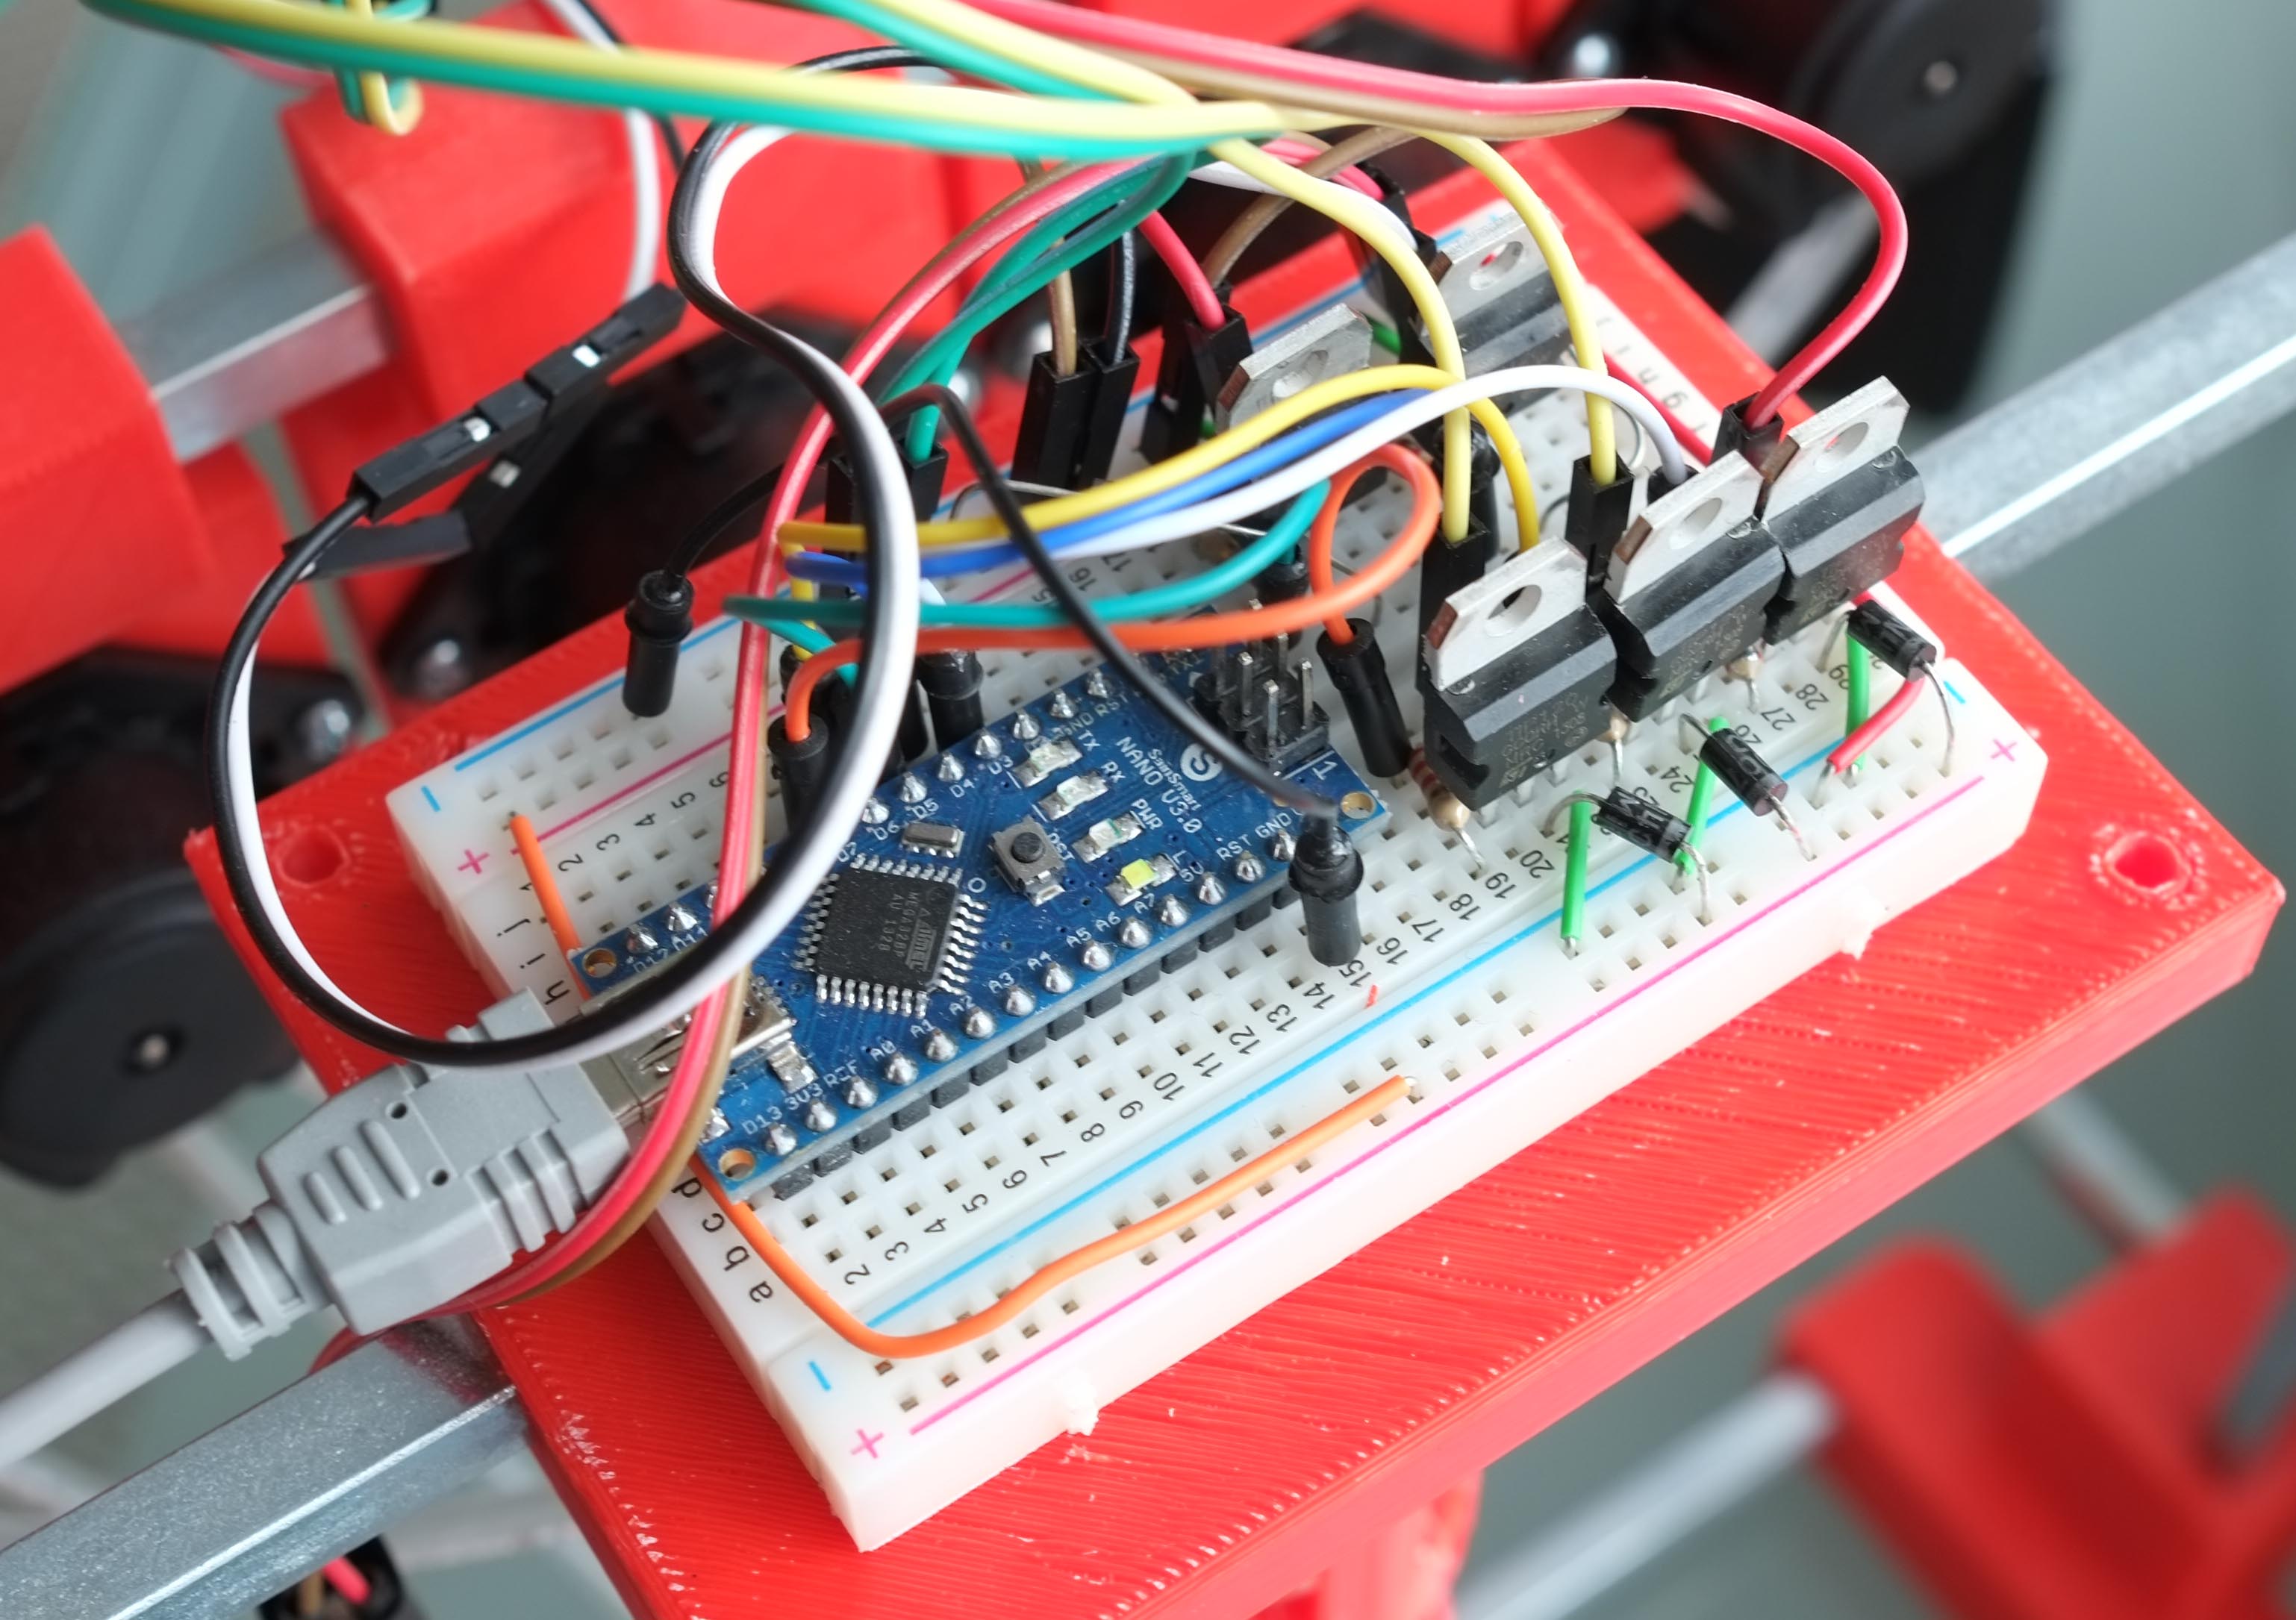
Obviously, yours may look slightly different. However, I recommend placing the Arduino’s nano so that its USB port is on the edge of either side of the breadboard.
Assembly
After printing all of the pieces, remember which piece is which based on the 3d model. Remove all of the support pieces from the 3d printed items with pliers and/or a flathead screwdriver. It is likely that it will be a very tight fit for the steel rods, so you’ll need to push the rods in with a lot of force. I recommend using gloves.
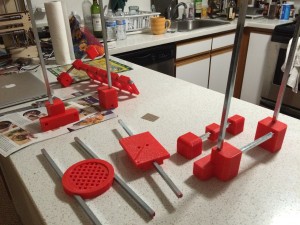
Also, the order in which you assemble the robot IS important. Here’s the order that I used to assemble. Basically, you need to remember to assemble the middle parts first before connecting the left and right sides to them.
- Insert all 5 of the pump holders onto one of the steel rods
- Insert the drink tray into the center of two of the steel rods
- Insert the breadboard holder (bottom piece) into the center of one steel rod
- Assemble the left side, then assemble the right side
- Insert the steel rods for the drink tray, pump holders, and breadboard holder into the left side
- Connect all of the parts of the right side
- Insert each of the pumps into a pump holder and screw them in with two #4 screws each
- Attach the center channel to the top center section using two #6 screws
- Tape the breadboard to the center of the top-middle section, ensuring that the top piece of this section will fit over it
- Wire everything up based on the circuit schematic
- Place the top piece (labeled #BarMixvah in the photo below) over the breadboard, moving wires around until everything fits snugly inside
- Insert two #6 screws through the screw hole and tighten the nuts at the bottom to secure it in place

Well, that’s all for this week. Let me know if you have any questions in the comments and I’ll try my best to answer them.
GitHub link: https://github.com/ytham/barmixvah
Note that the 3D model and stl files are located in the CAD/ folder, and they are printed with the MakerBot Replicator 2X.
Stay tuned for part 2, the software design!
Follow me on twitter: @yujiangtham
Navigation:
- Part 1: Hardware and Electrical Design (you are here)
- Part 2: Software Design
- Part 3: Operation, Caveats, and Further Modifications
May 26, 2014 at 6:51 pm
sickk
May 27, 2014 at 6:06 am
Great!!.
May 27, 2014 at 10:26 am
Looking forward to part 2.
Thats some great work, I’m gonna build that thing!
May 27, 2014 at 3:02 pm
Thanks! Part 2 should be coming in the next few days. 🙂
May 27, 2014 at 12:05 pm
You seem to have the diodes backwards in the drawing http://yujiangtham.com/wp-content/uploads/2014/05/circuitdiagram.png
Standard flyback diode https://dlnmh9ip6v2uc.cloudfront.net/assets/9/8/6/0/f/51770c5bce395f3149000000.png
May 27, 2014 at 3:02 pm
Oops! You’re totally correct. I’ve fixed the diagram. Thanks!
May 27, 2014 at 3:58 pm
Do you have any plans on selling this as a kit, as many of us don’t have access to a 3D printer.
Cheers,
Praneil
May 27, 2014 at 4:03 pm
At this time I have no plans to sell it as a kit. If you don’t have a 3d printer, you can still build the robot. If you can find some material that will stick the metal rods together (maybe getting some clay and the hardening it, or welding the metal rods together perhaps), then it can be done. The meat of the robot is the software that controls it. I’m still writing part 2, which will be coming soon. Thanks! 🙂
May 27, 2014 at 9:22 pm
You could probably make this using Sugru or you could use a 3d printing service like Shapeways or Ponoko. Only problem with those services is that they don’t want to recognize the .stl files for some reason. They keep saying the paths are out of range.
Any suggestions on altering them so I could get these printed would be appreciated.
May 27, 2014 at 9:44 pm
To be honest, I’m not sure. I’ve never used any of these services before, but I’m guessing that it’s because the coordinates of the .stl files are not centered at <0,0,0> due to the fact since they were exported in-place from the .blender model. There should be some sort of way to center and lay the prints flat. If you can do that, I think it might work.
May 27, 2014 at 10:53 pm
I’m probably missing something but when opening the .stl files in maker ware in order to print them on my makerbot 2x they are abnormally small, when using the recommenced IN to MM conversion they are to big for the build platform, any suggestions ?
May 27, 2014 at 10:59 pm
Sorry, I forgot to mention this in my blog post. I’ve updated it to mention the following: for some reason, .stl files seem to be shrunk 10x in all dimensions. I have no idea why. Happens w/ not just blender, but other software too. You need to scale it (keeping the aspect ratio) 1000% in MakerWare.
May 27, 2014 at 6:01 pm
Looks great, order all my stuff on amazon and ebay here in the UK, going to start the 3d printer going tomorrow, can’t wait for part 2 and 3 and get this working……..
May 27, 2014 at 6:03 pm
Awesome! Let me know if you run into any issues!
May 27, 2014 at 6:33 pm
Cool! I’m keen to build one, and yours is the best I’ve seen yet … I just ordered my pumps!
Looking forward to part 2.
May 27, 2014 at 7:14 pm
Could this be scaled up to 10-12 drink sources, maybe using a standard Arduino if the Nano isn’t capable? This is an awesome project and something I’d really like to try out
May 27, 2014 at 7:26 pm
Absolutely. It should support as many pumps as there are digital out pins. On the Nano I believe it’s 12 or 13. The main thing is that you need a power source that will support 12 pumps. Each pump is rated at 300mA, so 12*.3 = 3.6A. Therefore, you’ll probably want a 12V DC power supply that is 4+ amps. They’re pretty cheaply available on Amazon. 🙂
(You’ll also probably want to modify the UI a little bit so that you have 2 rows of 6 pumps instead of rows of 5 pumps).
September 16, 2014 at 11:45 am
Hey,
Did you measure the Amp draw of the pumps? I only have a single 12v psu (2A) and the pump jumped between 200ma and 2A+. Not sure why maybe its just my cheap multimeter.
June 4, 2014 at 4:05 pm
If you go beyond that, you will need to update your chassis connector more than likely to a 2.5mm from the 2.1mm that is shown in the parts list.
May 27, 2014 at 7:21 pm
Which 3D printer did you use, I would like to buy one, any suggestion?
May 27, 2014 at 7:33 pm
Any 3d printer should do, but you’ll need to ensure the calibration is correct for the 5/16″ steel rods to be able to slide in w/ some friction. The rods should not be loose. I used Makerbot Replicator 2X w/ ABS plastic.
May 27, 2014 at 8:22 pm
Very cool. I’m an engineer at Microsoft and would like to see if we can get this ported to the .NET Micro Framework platform (e.g. NetDuino). Please let me know if you’re interested.
May 27, 2014 at 8:28 pm
Very interesting. Unfortunately, I have absolutely no experience in .NET. However, all of the code is on GitHub (link is in the article) so you’re free to use it as you wish. Thanks!
May 27, 2014 at 8:40 pm
This looks great. Thanks for posting up the instructions.
I’ve been thinking about doing something similar for a while and other than not knowing how to set up the software side due to a complete lack of programming skills (so looking forward to seeing how you did that) I was reluctant to use these 12v peristaltic pumps. They are rated at 100ml per minute so thought they might be a little slow. How did you find the pour time for drinks with a large single ingredient or mixer?
May 27, 2014 at 8:47 pm
No problem. The pumps are pretty slow, but it’s not bad if your drink has 3 or more ingredients. However, you’re correct in that 100ml/min is not the fastest. The problem is that there aren’t too many options for cheap peristaltic pumps. I couldn’t find any that were faster that were cheap enough to have at least 4 different ingredients.
May 28, 2014 at 1:11 am
I’ve been planning out a setup with Node.JS and Johnny 5 on a Rasp Pi since I visited a friend in Kansas City who made the Intoxicator KC bot. He even has his sending tweets to say what drink is currently being made. I believe he uses non-parasitical pumps like this http://www.amazon.com/dp/B00D82W60O/ref=wl_it_dp_o_pC_nS_ttl?_encoding=UTF8&colid=3NNWPF4IFSBI1&coliid=IN0DX6X6OUVDC I haven’t decided which way to go yet.
May 28, 2014 at 1:33 am
Very cool. To be honest, I haven’t had experience with other pumps before. Do you have to submerge them? I chose peristaltic pumps in this case because I didn’t want the mixers to touch anything except the tubing, keeping it sanitary.
May 28, 2014 at 2:33 am
No he doesn’t submerge them they are all up in a top compartment. https://scontent-b-iad.xx.fbcdn.net/hphotos-xpa1/t1.0-9/1472938_1383614605219843_367375776_n.jpg
May 28, 2014 at 2:37 am
Oh very cool! Yeah, not familiar with those pumps but in terms of wiring them up, it looks to be exactly the same. 🙂
July 9, 2014 at 11:34 pm
I started this project not realizing it had to be tethered to a laptop to function. So while waiting for my pumps to arrive I decided to use a raspberry pi for the brain instead since I can host the db and web and talk to the pumps all on one device. I still have to mess around with the barmixvah.git to function with the pi, but after installing the mongodb on the pi I am realizing its too much overhead, and thinking about stepping back to use a LAMP setup instead to make it more lightweight.
here’s a pic of my modded top piece
http://i.imgur.com/gacPzzZ.jpg
March 19, 2015 at 5:18 pm
I was thinking of using the Raspberry PI myself to make a stand alone solution. Any suggestions, modifications in terms of electronics, code etc, you can suggest or share?
December 7, 2018 at 7:51 pm
did you ever finish this project with pi? if so can you send some informative link my way lol
May 27, 2014 at 9:09 pm
Only 12 commits?! What a g.
May 28, 2014 at 12:28 am
What units are your Blender models in? When I import the .stl files into my 3D slicer program the parts are incredibly small and they need to be scaled up. This looks like a cool project I look forward to your future posts. Thanks.
May 28, 2014 at 1:00 am
Units are in centimeters, but it looks like there’s some issue w/ Makerware thinking it is millimeters. Apply a 1000% scale to each .stl object (preserve aspect ratio) and everything should be the right size.
May 28, 2014 at 4:56 am
WOW !! your project is Amazing .. I will certainly try to make one for my self. 3D Printing and drinks is the next best thing happening to Mankind.
May 28, 2014 at 5:34 am
Great project. I have a couple of questions how is the menu programmed for this do we need to program each menu? I mean to say let’s suppose I need a drink of 200ml with different ingredents do I need to program the drink to mix those ingredents ? My other question is there a way lets say I find a drink on internet which says to mix different proportions and I can just copy that text and able to decode the ingredents and store it as a menu automatically can we do this ?
May 28, 2014 at 5:44 am
I’ll go over the details of how the drink system works in part 2, which should be done in the next few days. Ingredients are all in ratios, so there is no need to program for different sizes. As for your other question, the current system is a form to be filled out. If you want, you can write a parser in which you can copy and paste ingredients, but many websites use all sorts of different formats and names for ingredients and variations in how they are laid out. The way you’re thinking of would require a little bit of machine learning as well to match the text to your list of available ingredients. It does not seem trivial in the least, but the code is on github so you can go ahead and give it a whirl if you’d like. If you end up doing it, be sure to send a pull request!
May 28, 2014 at 10:32 am
So your Arduino has to be permanently connected to the PC/Mac running the web-server, correct? How about switching to RPi so you can have the web server running directly on the board? Use a wifi dongle to connect to your local network and then you can have a truly standalone unit. The software would remain more or less the same. You could use a voltage regulator to power the RPi from the same 12V source, if you have enough amperage to spare.
May 28, 2014 at 3:06 pm
That’s a great idea! Unfortunately I haven’t had as much experience with the RPi as I would like, so I decided to just stick w/ what I knew for this project. My next project will definitely involve the Pi since I want to do something more compact. Thanks!
June 4, 2014 at 12:37 pm
What about getting rid of the Arduino completly?
Since the Pi has some GPIO, we could use the ULN2803A and everything should work fine.
Maybe I’ll throw a circuit together and test it.
I have to look up, if Jonny five can communicate with the Pi pins.
May 28, 2014 at 11:30 am
Hallo,
to make it simple, Change the 5x TIP120 w/ Diodes and the 5x 2.2kOhm resistor to one ULN2803A:
It is a Darlington Transistor Arrays witch Needs no additional components!
You can drive it direct with the Arduino an the ULN2803A can direct drive the pump.
With one single chip, you can drive all 🙂
May 28, 2014 at 3:07 pm
Oh freakin’ sweet! Thanks for the tip! 😀
September 15, 2014 at 4:25 pm
How do you wire it up using the ULN2803A
November 25, 2014 at 8:07 pm
Yes… How?
May 28, 2014 at 3:44 pm
I think I just found my next project. Looking forward to the rest of your posts.
If I proceed forward, I’m happy to help you get this converted to a Raspberry Pi based unit.
May 28, 2014 at 4:05 pm
Awesome, that would be fantastic! Thanks! 🙂
May 28, 2014 at 4:39 pm
When are the next tutorials coming?!
May 28, 2014 at 4:46 pm
Hopefully I’ll be able to finish it within the next few days. There’s quite a lot of things to go over!
May 28, 2014 at 7:38 pm
Very clever and interesting device. I know this may seem like a strange question but, if you would not mind, how long did it take you to design this? I am always challenging my team to “think simple” when they are working on proof-of-concept ideas. Some engineers find it difficult to boil a project down to its simplest terms in order to demonstrate the principles. Bravo to you, Yu Chiang!
May 28, 2014 at 7:42 pm
Hi Mitch, thanks for your kind words. The total time from design and planning to doing the software to printing and building the robot was about 2 weeks. If you add in the time it took to receive my shipment of stuff from China, probably a total of 3-4 weeks.
May 29, 2014 at 3:35 am
Great design and thanks for sharing. I’ve noticed an issue with the “Center – Common Drink Channel – Lower Piece.stl” file. It seems to have a edge sticking out the side of it. I’ve confirmed this when scaling up in Makerware. Also, the file fails when attempting to upload to NetFabb to see if it can be repaired.
May 29, 2014 at 3:48 am
Sorry, that piece isn’t actually supposed to be there. You can ignore it; it’s not part of the final design that you see. Thanks for letting me know.
May 29, 2014 at 4:21 am
Aw, thanks for the quick response.
Curtis
May 29, 2014 at 4:44 am
Awesome project! Can’t wait for part 2!
I started building one awhile ago. With a front end running on a PC, SQLite database for the drinks and ingredients and the GUI done in Java, with an arduino back end. Got about 60% of the java code done and got distracted by another project. Hats off to you for a good clean design and getting it done so fast!
I’m going to have to download your source and get to looking through it. Interested in how you did the interface and how the database is setup; never worked with mongo before.
Thanks for posting all of your files and work also. Is part 2 done yet?? 🙂
May 29, 2014 at 8:40 am
Amazing project. the idea is simple and excellent.
I keen on to realize this great thing.
Very thanks to share this experience with us !!
May 29, 2014 at 8:57 pm
This is cool. I’m new to reading wiring diagrams, can you post a better picture of your board. I’d like to see if i can compare yours to the wire diagram and learn from it. Thx.
July 18, 2014 at 10:23 pm
Yes i agree! More detailed pictures would help us none electrical engineers out a bunch.
July 28, 2014 at 5:17 am
I’ve added an additional photo with better lighting. Hopefully this helps!
April 8, 2017 at 3:20 pm
Hi Yu, Fantastic work documenting and sharing this. I’m a little amateur when it comes to breadboards and arudino’s also. Any additional photos, or views on which components need to be in which pins of the breadboard would be appreciated. I know it’s hard to likely get a shot but more is better ifyou can get all angles. I can’t see the far side of the board in the photo you uploaded to know whether I’m connecting the right pins. I can try and parse the electrical diagram but I’m rusty. Anyone else’s help / links to photos also appreciated!
May 30, 2014 at 8:18 pm
What size tube are you using ?
May 30, 2014 at 8:42 pm
I’m using the following tubing here:
https://www.amazon.com/Tygon-E-3603-Laboratory-Tubing-Length/dp/B000FOWHD4/ref=as_sl_pc_qf_sp_asin_til?tag=yujith-20&linkCode=w00&linkId=IKKOPV744IOU42JM&creativeASIN=B000FOWHD4
July 1, 2014 at 7:54 pm
I’ve tried using that size tubing in my pumps and it doesn’t seem to get an air-tight seal. When comparing at the 1/8 OD tubing with the tube that comes with the pump, the replacement tubing clearly looks to be a smaller diameter. Have you in to this problem?
July 2, 2014 at 12:32 am
For the most part, the liquid in my pumps seems to stay, although I’ve seen one or two times when the liquid will go back. Perhaps a smaller ID tubing might work better, but I wasn’t able to experiment with different sizes.
June 5, 2014 at 5:07 pm
Got my pumps from China , got myULN2803A , still can’t get a decent 3d from the replicator dual, but I will get there, just waiting for part 2 and 3 get this baby going……
June 5, 2014 at 7:16 pm
Hi Errol, part 2 is already up and should be sufficient to get it going. Part 3 talks about some of the finer intricacies as well as extensibility. Thanks!
June 6, 2014 at 6:40 am
That will teach me to look at the top of the page 🙂
June 7, 2014 at 1:25 pm
Hi, nice work and great idea!!
How many drink you can make with 5 ingredients? I see your db in your zip folder, but there are more of 5 ingredients.. I not understand, how we can maximize our cocktails with few ingredients?
Thank you very much!
Ciao!
June 7, 2014 at 10:25 pm
I only have a few example drinks there. It’s up to you to add whichever ones you’d like or extend the robot to have up to 12 pumps. You can find recipes on various sites like http://www.thespir.it/cocktails/
July 3, 2014 at 9:25 am
Hi Yu
Thanks for the guide ! I really appreciate it, would it be possible to get some more images of the wiring ? it´s still a bit hard to figure it all out from the drawing + the one photo that is up now. Especially how the TIP120 connect up. I’m currently trying to do the wiring setup mentioned above + one using a ULN2803A.
The ULN2803A is working until the point where it should power the DC motor, but it only output 0.2 volts to the motor, which apparently is by design, when I have figured out how to bypass that part (any input is very appreciated), I’ll share the wiring scheme .
Getting it all up and running on a Raspberry pi is then the next step 🙂
July 3, 2014 at 6:55 pm
Got the ULN2803A setup working, here is the wiring layout: http://oi59.tinypic.com/33ykzu0.jpg
– Aleksander
July 16, 2014 at 11:58 am
Aleksander: i see on schematics that the wiring is at pin 13 on arduino. Does that mean that i need to edit Ju Jiangs code??
July 21, 2014 at 2:37 pm
Yeah If the code are referring to another pin, then you need to update the code. It should be quite easy to find.
July 21, 2014 at 7:41 pm
Could you post details on what needs to change in the code for this setup to work? That would be awesome!
July 28, 2014 at 5:24 am
You can check out section 3 for more details on the code changes to add more pumps:
http://yujiangtham.com/2014/06/12/build-your-very-own-drink-mixing-robot-part-3/
July 11, 2014 at 7:27 am
I am not certain the place you are getting your information, but
great topic. I needs to spend some time studying more
or understanding more. Thank you for magnificent
information I used to be searching for this info for my mission.
July 22, 2014 at 10:50 pm
Hey Yu,
I noticed that the “Center – Drink Tray.stl” has a piece of material missing from the model that is causing an interesting bug in Makerware; it is interpreting the void and trying to fill in the material. I’ve attached some screenshots, if they will help.
Could you please look into fixing the hole?
Thanks,
Justin
http://goo.gl/hKLOY4
http://goo.gl/zvxFWv
http://goo.gl/5HNgFY
http://goo.gl/eh3CXa
July 28, 2014 at 5:13 am
Very odd. I did not have that issue at all. I recommend downloading Netfabb (free, http://www.netfabb.com/) and fixing the .stl file using the software.
August 25, 2014 at 9:54 pm
I had issue with this part on some slicers, but Simplify3D was finally able to slice and make it printable.
Netfabb wasn’t really able to fix whatever the malfunction was with it.
August 15, 2014 at 4:47 pm
Great project, good implementation. Good use of 3D printing. However, you have built a machine not a robot. They are not identical.
August 19, 2014 at 2:55 pm
hey, great work, i’m thinking about building it at home, but i got a question before i start.
can you tell me how long it takes to get an 0.5l cocktail or better said, how much is the flowrate of the peristaltic pump (and of the RS-360 too) ?
August 24, 2014 at 4:15 pm
@Julian
I got 100 ml pr. minute pr pump from the peristaltic pumps I found on ebay (china).
August 25, 2014 at 8:22 pm
We built one, but I couldn’t see using a PC. So we used a Raspberry Pi with an Arduberry for the I/O.
Arduino (Arduberry in this case) programmed to accept the drink order as a formatted string from Python running on the Pi. It then handles delivering/mixing. A lot of fun (except for writing the ardunio code) if anyone wants the code (for either or all components) let me know.
September 1, 2014 at 5:44 pm
Would love to get in contact for more information on PI solution.
Have an event coming up that would fit a BarMixvah..
A guide for PI or a copy of the image would be great.
mippen.gbg (a) gmail.com
January 5, 2015 at 6:35 pm
Hi, could you email me the info with your code? eback83@gmail.com
Thanks
October 22, 2015 at 5:30 pm
Hey there,
Would you mind sending me this info as well? A guide for PI and the Ardiuno code would be helpful. rsenesac@comcast.net
Thanks!
November 14, 2015 at 1:11 pm
Hello Mark, can you please send me an eMail with all your stuff for your RPi version?
fabiandeynet@gmail.com
March 15, 2016 at 12:41 pm
can you send me a copy of your code
June 20, 2020 at 11:29 pm
if you still have the code is it possible that you can send it to me ?
thanks
September 12, 2014 at 12:34 pm
Finally i quit my regular job, now i earn a lot of money
online you should try too, just type in google – slabs roulette system
September 17, 2014 at 1:13 pm
Mark Tomlinson
Yes very much, please share.
September 20, 2014 at 8:58 pm
Hi,
I love your tutorial and have ordered all the items to try and build this. But do you think you can take some more pictures of the breadboard from different angles. I’m not the best at reading circuit diagrams.
September 25, 2014 at 4:03 am
Download the file error can send me a message without 77167898@qq.com
September 27, 2014 at 8:47 am
蠕动泵 你们那里多少钱 一个我这里好贵 。
October 10, 2014 at 1:10 pm
When i power my pump the shaft slips on the internal rollers resulting in no actual pumping. The shaft just spins. If i remove the tubing there doesn’t seem to be any slipping and the rollers spin with the shaft. Has anyone else seen this issue? Could it be too much power to the motor?
October 15, 2014 at 4:52 pm
Have you ever thought about adding a little bit more than just
your articles? I mean, wha yoou say is fundamental and everything.
Nevertheless imaagine iff you added some great images or video clips to give your posts more, “pop”!Your content is excellent but with images and videos,
this website could definitely be one of the greatest in its field.
Fantastic blog!
November 9, 2014 at 2:36 pm
Hi,
Great job ! It inspired me for my project.
I’ve used the same pumps & diagram for a hydroponic setup, but I got an issue: first pump is ok, but pump 2-3-4 are activated at the same time, pump 5 is ok.
I changed my sketch, tried activating pump 3 only (but then pump 2 & 4 are working too). I checked my breadboard, changed to a overboard… the same thing.
Any idea ?
Thanks !
November 11, 2014 at 6:48 am
I found my error 🙂 The TIP120 have the dissipator connected to Base, so if they touch each other, then the trigger is short circuited !
So watch out when you have multiple ones, don’t put them on the same radiator, and isolate them !
December 23, 2014 at 9:37 pm
hello sir!
how much did the whole thing cost? just roughly…
December 6, 2014 at 1:15 pm
Hello, i need your help.
I want to add a switch that´s dected the glass. And when no glass on the switch it doesen´t start the pump but shows in the Frotend (Webinterface) “Please put a glass under the spout”.
I know the hardwarepart, but i doesen´t know what i have to do in the backend and frontend.
December 8, 2014 at 11:22 pm
Hi, I’ve been trying to 3D print the pieces from 3D printing websites, but they all say that the dimensions of the product are too large for their machines. Any ideas why this is happening or suggestions for which sites to use?
Thanks!
December 23, 2014 at 9:34 pm
Duuuuude, that´s amazing!
i also appreciate that u recomment to all these guys here!
you are awesome! maybe the day will come when i try to rebuild this thing too!
will save ur URL 🙂
thanks for your work, your share and merry christmas dude!
greetings from germany!
December 23, 2014 at 9:40 pm
just another thing: can u update your “cart list” ??! would be nice 🙂
March 23, 2015 at 4:07 pm
This content is very entertaining but I see that you are not using the full earning potential
of your page. You can earn pretty good promoting products
related to health and beauty niche, don’t waste your traffic, just type in google:
Polym’s earning ideas
March 26, 2015 at 3:32 pm
I am not sure if you still check this but do you power the arduino and the pumps from the same source or two different sources?
July 8, 2015 at 9:45 pm
arduino with the usb and pumps with a power adapter
May 6, 2015 at 8:14 am
Could I build this with an Arduino Uno? I don’t have an Arduino Nano and they’re essentially the same thing (specs-wise), so is that possible, or no?
May 27, 2015 at 3:52 pm
Hi!
Can anybody please send me a picture of their wiring so I can check with mine. Something is wrong as the bar isn’t detecting the pumps but I’m an amateur and could do with the help!
Oliver
July 8, 2015 at 9:46 pm
how many pumps are you using?
July 9, 2015 at 9:38 pm
email me I will send you the pictures
bocachicadr@yahoo.com
October 5, 2015 at 8:56 am
I trying to make one just like your, I need more accurate from the pump. I want to use it to mix e juice. I just dont get how is the Arduino going to work with the pump to get the exact proportion from the liquid.
October 6, 2015 at 11:39 am
I know this web site provides quality dependent
articles and extra information, is there any other web page which gifes these stuff
in quality?
October 18, 2015 at 11:32 am
Hey There. I discovered your blog using msn. This is a really smartly written article.
I will make sure to bookmark it and come back to learn extra
of your helpful info. Thanks for the post. I will certainly comeback.
October 19, 2015 at 8:35 am
Hi! I’d like to make a similar project only I’m using a netduino and valves instead of pumps. How can I know which type of transistor and what resistor I have to use?
November 25, 2015 at 8:32 am
Does someone have a clear diagram of the breadboard or good photos of how this should be wired up? I am a software guy and don’t understand how to go from logical diagram to physical diagram.
April 28, 2016 at 3:23 am
Everything is working especially the circuit and yet I do have a questions, pin 7 is working perfectly but when it comes to pin 3 to pin 6. It doesn’t work at all, is it just me or I’m lacking of something. Help please
May 4, 2016 at 11:49 am
Have you tried switching the PIN’s that dont work to PIN 7 just to insure your circuit is correct? Sounds like a wiring problem
July 27, 2016 at 10:53 pm
Hi,
I was able to run through your instructions specified by you and it worked like a charm. Thanks for the work you share. Though i have few issues and concerns that i wanted to clarify,
1. When the system is switched on i don’t see any previously add drinks on the main page.
2. Is this has to be connected to system only to make this application run or it can be hosted into cloud etc….. when we can excuse it remotely.
Can you please help me, Thanks in advance.
July 30, 2016 at 1:02 pm
Instead of using the pumps you can put the bottles looking down and let gravity act with this 12v activated water switch:
http://www.aliexpress.com/item/1pc-New-Electric-Solenoid-Valve-Magnetic-DC-12V-N-C-Water-Air-Inlet-Flow-Switch-1/32666183967.html
It is normally closed and when have the 12v it opens, so instead of pumping will let the water flow down.
I havent tried yet, Im wating the shipment of the valves.
September 1, 2016 at 3:26 pm
Has someone got a clear diagram of the breadboard or good photos of how this should be wired up please.
October 5, 2016 at 11:00 am
If you are interested in topic: easy earn money online free – you should read
about Bucksflooder first
October 20, 2016 at 7:31 am
I am almost completely finished with the build. The only issue I am having is that my pumps default to being on when I connect the power supply. When a drink is made the pumps that should be running run, and the pumps that shouldn’t do not run, but when the drink is complete all the pumps are on again.
I tested the voltage outputs of the pins when the pumps are running and not running. When my pumps are on there is 0V and when the pumps are stopped (during making a drink) there is 5V. Any suggestions on what I might have done wrong?
December 18, 2016 at 4:21 am
That’s a wonderful project, excellent! Good work. If anyone require the peristaltic pump, freley email me, thanks. Regards Amy eMail: sales@kamoer.com
March 5, 2017 at 1:04 pm
We built this a while back, awesome project.
We recently got around to rewriting it to actually use a java program to run the show. Works fine on Raspbian. Threw it on GitHub if anyone else wants to go that route.
March 26, 2017 at 8:51 pm
Would appreciate a pointer to any details please Mark ashepp@gmail.com
May 1, 2017 at 7:19 am
https://github.com/marktoml/BarBot
January 2, 2018 at 3:44 am
can u write a tut fot wiring an using an all.
May 2, 2017 at 12:57 pm
I’m having a hell of a time assembling the structure. The size of the square holes seems just too tight for the steel rods. Any tips?
May 29, 2017 at 4:25 pm
I’ve got the breadboard almost setup but I’m afraid I’m confused on how exactly to lay the wires for the pumps. Does the powe socket connect to the arduino somewhere? I don’t see it in the image. Any help appreciated!
August 8, 2017 at 11:59 pm
Is it possible to use your food printing article and image?
My name is Gyo Jin Hwang. I am Korean. I am writing a 3D printing book. Is it possible to use the article and picture on the homepage of the YU JIANG THAM(Bar Mixvah)?
Let me introduce about the book. The book is regarding 3D printing, and I have not yet decided on the title. The primary content of the book is on 3D food printing. To briefly introduce the book, it summarizes in a new way, the changes in the diet and food industry in line with the changes in people’s everyday lives, along with social systems and technological changes. The book also describes the changes in 3D food printing with the direction of change in the food industry. Additionally, it explains how 3D food printing breaks from the laboratory and applies to everyday life and evolves into business. I would like to use the contents and photos of the YU JIANG THAM(Bar Mixvah) homepage. I want to use it to publish my 3D printing book. And in my book on 3D printing, I would like to use them in the sections on concept of 3D food printing.
Let me tell you about the use plan.
First, I want to include the contents in my book to be published.
Secondly, when the book is published, it will receive an international standard book number, ISBN.
I’ll also indicate you as a reference to the content at the end of the book. If I use any images, I will disclose the source of the images.
Thank you.
December 13, 2017 at 9:55 am
Dear Gyo Jin
I suggest a tittle for your book.
“3D future”
August 9, 2017 at 12:01 am
My name is Gyo Jin Hwang. I am Korean. I am writing a 3D printing book. Is it possible to use the article and picture on the homepage of the YU JIANG THAM(Bar Mixvah)?
Let me introduce about the book. The book is regarding 3D printing, and I have not yet decided on the title. The primary content of the book is on 3D food printing. To briefly introduce the book, it summarizes in a new way, the changes in the diet and food industry in line with the changes in people’s everyday lives, along with social systems and technological changes. The book also describes the changes in 3D food printing with the direction of change in the food industry. Additionally, it explains how 3D food printing breaks from the laboratory and applies to everyday life and evolves into business. I would like to use the contents and photos of the YU JIANG THAM(Bar Mixvah) homepage. I want to use it to publish my 3D printing book. And in my book on 3D printing, I would like to use them in the sections on concept of 3D food printing.
Let me tell you about the use plan.
First, I want to include the contents in my book to be published.
Secondly, when the book is published, it will receive an international standard book number, ISBN.
I’ll also indicate you as a reference to the content at the end of the book. If I use any images, I will disclose the source of the images.
Thank you.
December 13, 2017 at 9:57 am
Dear Gyo Jin
I suggest a tittle for your book.
“3D future”
August 27, 2017 at 1:17 am
Tony Montana Say hello to my little friend
September 14, 2017 at 9:44 am
We as makers like to loosely call anything computer controlled as robotic. I like to think of a robot as something that at least has some articulation or human quality to it such as a robotic arm or hand. What you have designed is very clever and interesting but I would consider it a drink mixing machine rather than a robot. Maybe you can work on one that has a pair of arms that can pour bottles and hand over the glass… now THAT would be a robot ! 😉
March 18, 2018 at 10:39 pm
For most up-to-date news you have to visit internet and
on internet I found this site as a most excellent website
for latest updates.
September 2, 2018 at 3:45 pm
hello YU JIANG THAM a pleasure to see your project, I would like to try what I have doubts is with the integration of the circuits. I have a mega2560 and a nema 17 as a thrust motor as I can do to put 4 dc motor and operate the nema 17. what is the driver I need for the dc engine and the nema to work together ?? From already thank you very much for your time. Best regards
April 14, 2019 at 9:52 am
I had a wonderful experience at Launch Academy.
October 26, 2019 at 5:22 am
เว็บไซต์พนันบอลฝากอย่างน้อย50
UFA700 แน่ๆ หนทางนี้นั้นก็อาจเป็นตัวเลือกที่ดีอย่างยิ่งจริงๆ
เนื่องจาก เว็บ ที่มีโปรโมชั่น จำนวนมาก นั้นอาจมอบ ความสบาย รวมทั้ง
ความสบาย ให้แก่คุณอย่าง แน่นอน ยกตัวอย่างเช่น ลงทะเบียนใหม่ รับโบนัสเพิ่มไปอีก 50 % หรือ เสนอแนะเพื่อนพ้อง รับโบนัส50 ลุ้น
เพิ่มไปอีกสูงสุด กว่า 500 บาท กันอย่างยิ่งจริงๆ แถมยังมี เปิดยูสแทงบอล50 การวิเคราะห์ ผลบอล แบบวันต่อวันให้แก่ท่านได้
เลือกดู เพื่อพิจารณา ใน การเสี่ยงดวงของ
การแทงบอลออนไลน์ นี้ เพื่อให้เพิ่ม ความมั่นใจ ของท่าน เพิ่มขึ้นเรื่อยๆ ทั้งนี้การ เปิดยูสเซอร์50
ไม่หนทางใด ก็ตามทีก็ ล้วนมี ทั้งยังจุดเด่น และ จุดอ่อน ตามมาคนจำนวนไม่น้อยคงพอจะทราบกันดีว่า การ เปิดยูสเว็บบอล50 ไม่ว่าจะ หนทางใดๆก็ตามแต่ว่า ล้วนมี อีกทั้งด้านดี รวมทั้ง ด้านเสีย โชคดีได้กำไร โชคร้ายท่านก็จะ เสียเงินเสียทอง ท่านควรควรจะ ระวังกับการแทงบอลออนไลน์ นี้อย่างเคร่งครัด ให้แด่คุณเล่น การพนันด้วย
ความสนุกสนาน แล้วก็ ใจเย็น ใช้สติอยู่เป็นประจำ มีน้อย เล่นน้อย ให้แก่คุณเก็บเกี่ยว กำไร ไป ทีละนิด ทีละน้อย แล้วนับว่าผลกำไร นั้นคือ สติ ของท่าน ท่านก็จะผิด การเดิมพันออนไลน์
นี้เล่นงานตัวท่าน พาตัวท่านเดิน ไปในทางหนไม่ถูก อย่างแน่นอน
สมัครแทงบอล50 เว็บไซต์แทงบอลพร้อมโปรโมชั่นสุดเด็ด 50 UFA700.COM
August 23, 2020 at 7:28 pm
What are the screw head sizes and driver style / type
October 15, 2020 at 5:34 pm
if it is for the pump I’m using these one
https://www.fastenere.com/6-x-12-phillips-flat-head-wood-screws-stainless-steel-316-qty-100?device=c&network=u&keyword=&creative=407306214398&placement=&gclid=CjwKCAjw5p_8BRBUEiwAPpJO69HEGJaTTY0zrfxLBAl4kF6m_wJgEUyRPWqHb9C9IeDP2q0HycY4JRoCZs0QAvD_BwE
i dont have the box on top
October 15, 2020 at 5:36 pm
sorry the 3/4
https://www.fastenere.com/6-x-12-phillips-flat-head-wood-screws-stainless-steel-316-qty-100?device=c&network=u&keyword=&creative=407306214398&placement=&gclid=CjwKCAjw5p_8BRBUEiwAPpJO69HEGJaTTY0zrfxLBAl4kF6m_wJgEUyRPWqHb9C9IeDP2q0HycY4JRoCZs0QAvD_BwE
May 30, 2021 at 11:55 am
I am in fact happy to glance at this website posts which includes plenty of useful
facts, thanks for providing such information.
December 19, 2021 at 2:35 pm
https://www.wanzani.com/werneyvepour darweld lauraley a30b5ac58e
January 14, 2025 at 5:46 am
Wow, that’s what I was searching for, what a
data! present here at this webpage, thanks admin of this site.