Welcome to part 3, the final part of this series of tutorials, on building your own drink mixing robot. Hopefully by now you’ve built the robot and gotten a little bit familiar with the code. This part of the tutorial will go over the general operation of the robot, alternative designs, and parts of the code that are unfinished. If you are just joining us in this post, here is the video again to get an idea of what we’re discussing:
Navigation:
- Part 1: Hardware and Electrical Design
- Part 2: Software Design
- Part 3: Operation, Caveats, and Further Modifications (you are here)
Adding Ingredients
In order to add ingredients, you have to add pumps. The ingredients and pumps match in a left-to-right fashion (if you are looking at the machine straight-on). To get to the pump controls, use the PUMP button in the top-right of the UI.
When the PUMP button is pressed, it opens up the pump controls, which look like this, minus the numbered buttons:
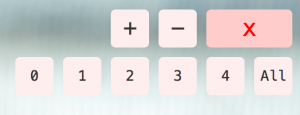
The (+) button will add a logical pump to the end of your list of current pumps, while the (-) button will remove a logical pump from the end of the list of pumps. You can add as many logical pumps as you want, but they will only work with the number of physical pumps that you have. Information on adding more physical pumps is in a section further down.
Numbered buttons in the pump controls correspond to the pumps on the machine. They allow you to activate an individual pump (or all pumps at once with the All button) for either debugging or cleaning purposes. Using the same control again will deactivate the pump.
Adding Drinks
To add drinks, point your browser to http://localhost:3000/add after the app has been started up. You should see a page that looks like this:
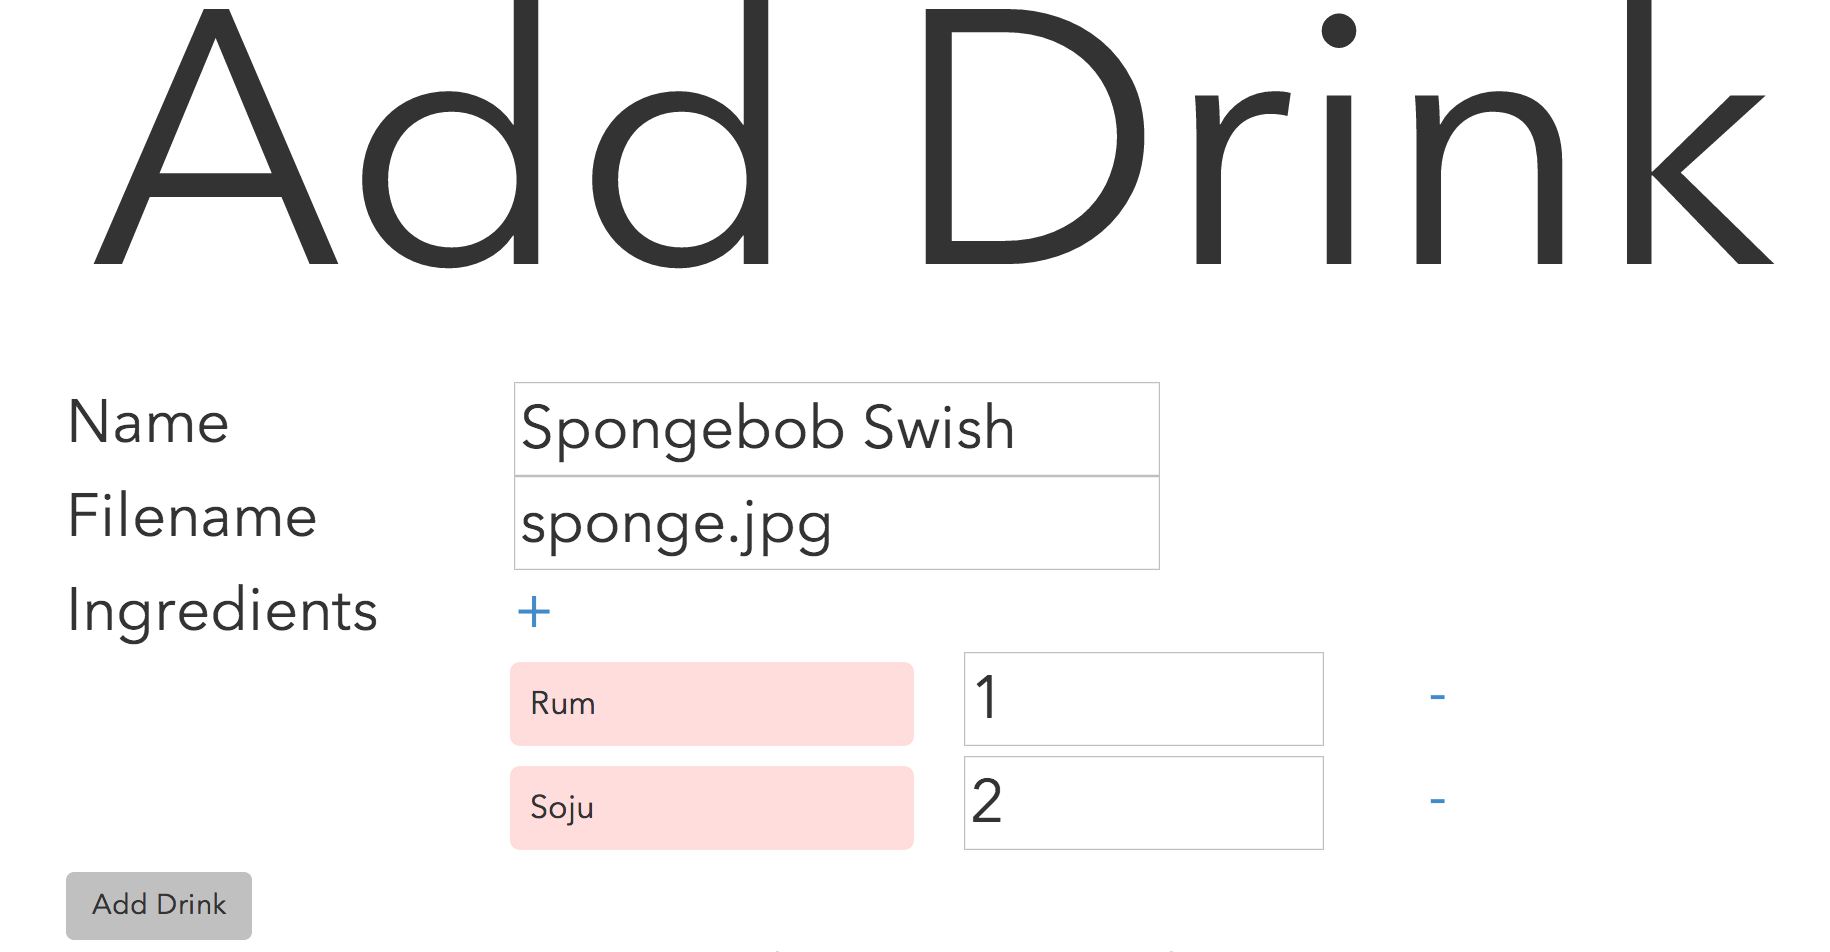
The Name field corresponds to the name of the drink that will be displayed to the user. The filename field is the name of the image used. If no image is specified, a generic image will be used. Ingredients for the drink (an unlimited amount) can be added via the (+) button, and specific ingredients can be removed via the (-) button to the right of the ingredient.
Images are to be placed in the /public/images/drinks/ directory.
Drinks amounts are specified in a relative basis. This means if you have a drink with two ingredients (A and B), { A: 1, B: 2 } is the exact same as { A: 5, B: 10 }, which is the exact same as { A: 0.25, B: 0.5 }. This is because the software normalizes the amounts before calculating how much to be dispensed based on the desired size set by the user. There’s no need to worry about units of measure, just make sure the ratios are correct!
When you click the Add button, there is no confirmation that the drink is added; the form will be cleared. I have not added any code in for this yet, so if you would like to add it in, please send a pull request.
Editing Drinks
Drinks can be edited at http://localhost:3000/edit
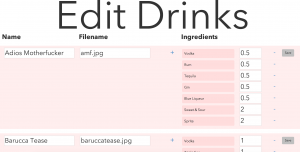
You can edit drinks in this section. Click the Save button to the right of the drink that you want to edit after you are done editing. Again, there is no confirmation that it has been edited. Additionally, this page does not yet allow you to delete drinks or add/remove ingredients to a current drink. These have not yet been added, so if you would like to send a pull request for these, I would also appreciate it.
Further Modifications
If you’d like to increase the number of pumps that are supported, you’ll have to modify the code in two places (noted in teal below), both in the backend.js file:
public/javascripts/robot/backend.js
 pump0 = new five.Led(7);
 pump1 = new five.Led(6);
 pump2 = new five.Led(5);
 pump3 = new five.Led(4);
 pump4 = new five.Led(3);
// Add new pumps here
// You may want to change the pin numbers as well

...

exports.usePump = function (pump) {
 var using;
 switch(pump) {
  case 'pump0':
   using = pump0;
   break;
  case 'pump1':
   using = pump1;
   break;
  case 'pump2':
   using = pump2;
   break;
  case 'pump3':
   using = pump3;
   break;
  case 'pump4':
   using = pump4;
   break;
// Add new pump-strings here as 'pump5', 'pump6'...
  default:
   using = null;
   break;
 }
 return using;
}
Alternative Designs
There are a few alternative designs that you can use for this robot. Instead of using 5 transistors and 5 resistors, you can use a single ULN2803A darlington transistor array (thanks CaTiO). Also, instead of using a computer running node.js, you should be able to simplify the design to a Raspberry Pi. However, I have not had any experience with the Pi yet.
3d Printer
A word about the 3d printer I used. It is a Makerbot Replicator 2X and I have been very happy with it. I’m not sponsored by Makerbot at all, but I just think that the machine is splendid and has given me very little trouble (compared to the Printrbot Simple that I had before it–I guess you get what you pay for). I have enjoyed using it immensely. I print with ABS plastic from SainSmart and I find that it works pretty well. The issue that I have with it is that the spool does not fit the spool holders that come with the Replicator 2X, so I had to use a custom holder that was on Thingiverse.
Well, that’s all. Thanks for taking the time to read through my post. Hopefully you have learned something; I know I have definitely learned a lot in the process. If you have any questions or comments, don’t be afraid to add something to the discussion below. Thanks!
Navigation:
- Part 1: Hardware and Electrical Design
- Part 2: Software Design
- Part 3: Operation, Caveats, and Further Modifications (you are here)